
It is time to update the Tailored pant instructions. This post will include instructions for a four-piece waistband, a two-piece waistband, and a one-piece rectangle waistband.
The pattern I have chosen is Simplicity 1696 for women, but these same instructions apply to men's trousers. The pattern is for a right lap fly zipper, but can be adapted for a left fly zipper.

LAYOUT
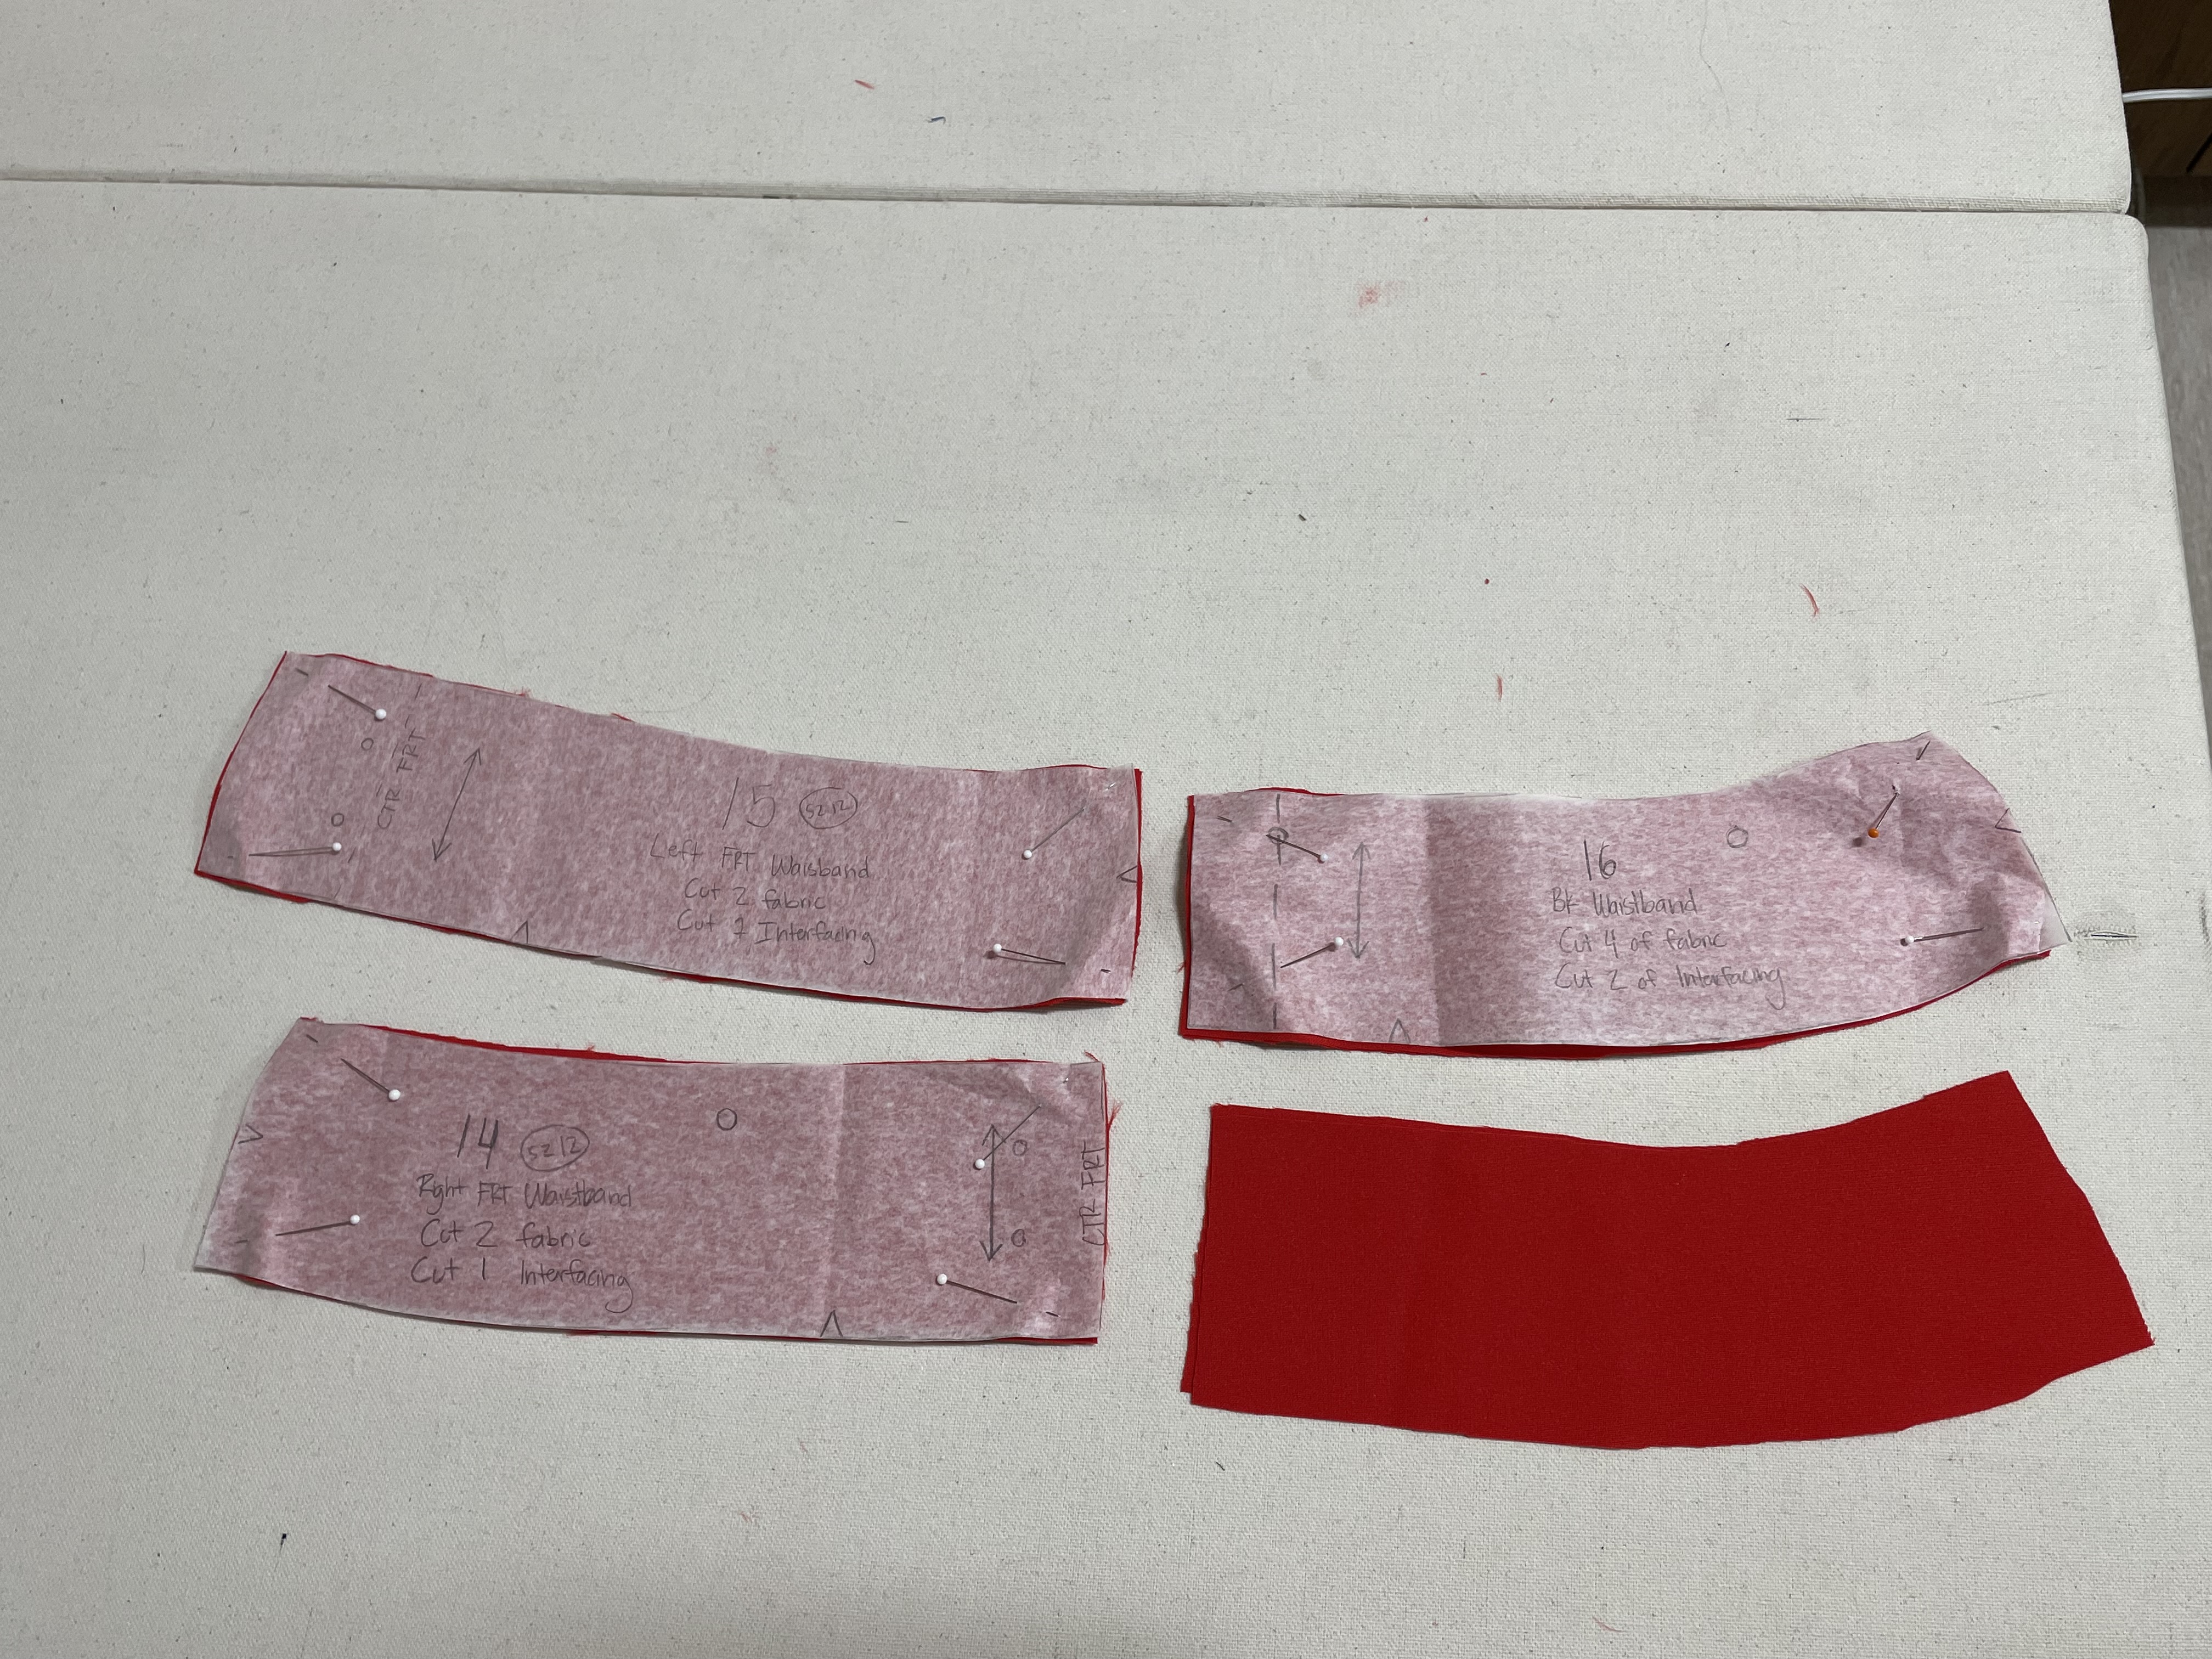
Lay out all pattern pieces for pants on the fashion fabric. These include pant front, pant back, left front waistband, right front waistband, back waistband, pocket facing and pocket yoke.

Here is a close up of the four waistband pieces: cut two of front left, cut two of front right, and cut four of back waistband.
Also cut out fly and underlap (fly shield). This one is cut on a single fabric layer.
.JPG)
Cut front yoke (side) pocket and pocket lining pieces out of lining fabric. Lining fabric can be polyester lining (China silk) or a lightweight cotton print. It needs to be lightweight but strong.

MARKING
Transfer all markings to wrong side of fabric, including unusual stitching lines, darts, notches, and circles.
Transfer all markings to wrong side of fabric, including unusual stitching lines, darts, notches, and circles.

If your center back seam is more than 5/8" seam allowance, transfer that marking as well.

Serge front and back crotch pieces, single layer. This has been serged with a three-thread stitch.
.JPG)
FRONT LINED POCKETS
Serge raw edges of yoke pieces.
Serge raw edges of yoke pieces.

Place pocket lining pieces right side up. Place pocket facing pieces right side up on top of pocket lining pieces, match notches, and pin together.
.JPG)
Stitch together on serged edge, and baste together the other edges.

Place front yoke pocket pieces right sides up. Place yoke pieces on top with right sides up, matching notches and pinning in place.
.JPG)
Stitch together on serged edge, and baste together the other edges.

Place pant fronts right side up. Place pocket lining on top of pants, right sides down. Pin in place, matching notches, in pocket opening only.
.JPG)
Sew pocket edges together, IN POCKET OPENING ONLY.

Trim and grade seam allowances, IN POCKET OPENING ONLY. (Remember "Widest to the World.")

Clip seam allowances on curves. Press seam allowances towards pocket lining.

Decide whether to understitch or topstitch pocket edges. The following pictures are instructions for understitching the pocket facing.

After understitching, fold pocket lining back and press seam edge. Do not let any of the pocket facing show on the right side of the pocket opening.

Add clapper pressing tool for crisp edge.

This is what the pocket edge will look like on the right side.

If you want to topstitch pocket edge, first turn pocket lining back, and press on seam edge. Do not let any of the pocket facing show on the right side of the pocket opening.

Topstitch pocket edge.

This pocket edge has been topstitched 1/4" from the edge.

Place pant front and pocket lining WRONG side up.

Add front yoke/pocket piece WRONG side down on top of pocket lining, matching edges and notches. Pin in place. A French seam will be sewn.

Sew 3/8" seam allowance. Trim seam allowance to 1/8".

Turn pocket wrong side out, with right sides together. Press along seam edge.

Finish the French seam by topstitching pocket seam 1/4" from edge on the wrong side of the fabric.

Pocket lining edge now has French seam to finish off outside edges.

NOTE: If you have front darts or pleats, sew them now.
Turn pants right side up. Match up notches on waist and side seams. Pin in place, keeping fabric smooth. Baste pockets to pants on waist and side seams.

Here are the finished pockets.

FLY ZIPPER
These instructions will be for a right fly zipper. Make sure marking for fly zipper topstitching is on RIGHT side of right pant leg.
These instructions will be for a right fly zipper. Make sure marking for fly zipper topstitching is on RIGHT side of right pant leg.
Put front pant crotches right sides together. Stitch from circle (or square) marking to within 2" of front inseam of pants.

Fly facing and fly guard have already been serged.

Place front pants RIGHT side up. Place fly facing RIGHT side down, matching up to front crotch, matching circle. Pin in place.

Sew fly facing to right crotch, stopping at circle. TIP: It is actually easier to sew on the pant side (instead of facing side) so that you can see where your previous stitching ended.

Stitching should meet the crotch stitching, but not overlap it.

Trim and grade seam allowance.

Press seam allowance towards facing. Understitch fly facing.

With fly facing RIGHT side up, place zipper on top, with zipper tape RIGHT side down. The left edge of the zipper tape meets seam. Pin in place. Make sure that the bottom edge of the left zipper tape is folded up and pinned. It is okay to have the extra length of the zipper above the pants.

Baste together on left edge of zipper tape.

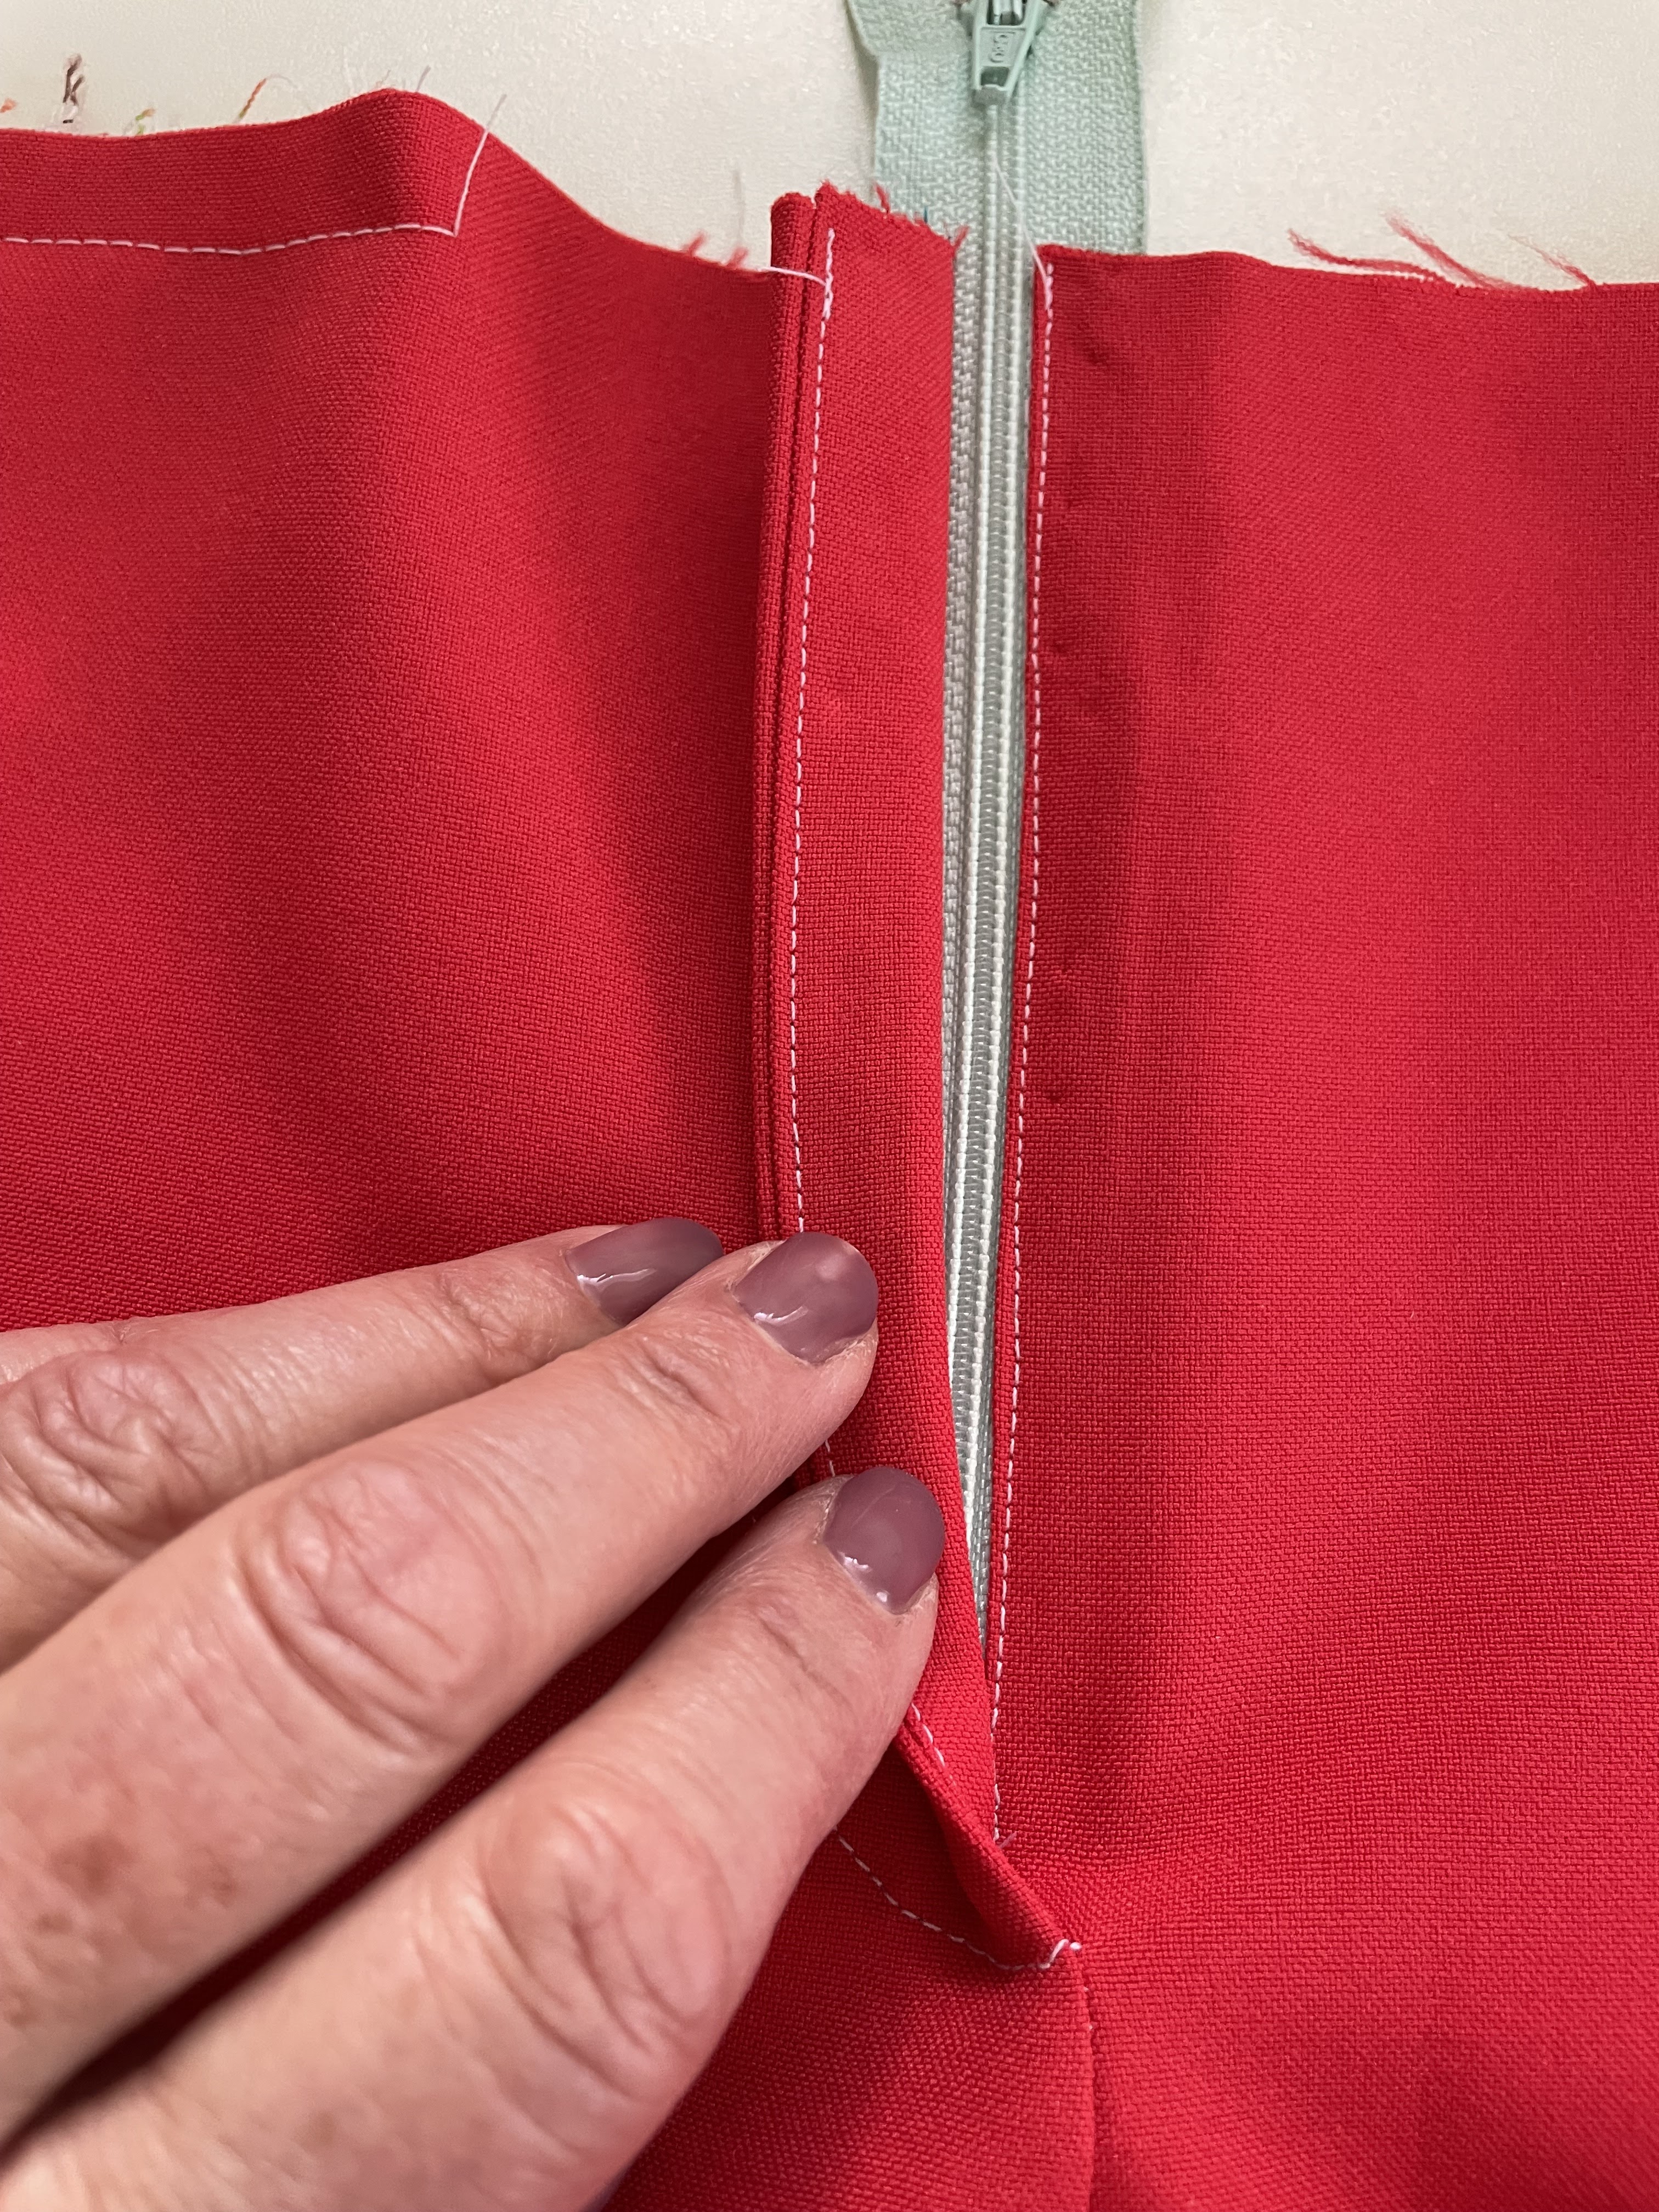
Attach zipper foot to sewing machine. Topstitch on right zipper tape, first stitching next to coil. Then stitch again next to edge of zipper tape. This will help strengthen the zipper.


Fold back zipper facing exactly on the CF seam. Pin through both fabric layers. Baste through all layers next to topstitching chalk marking.

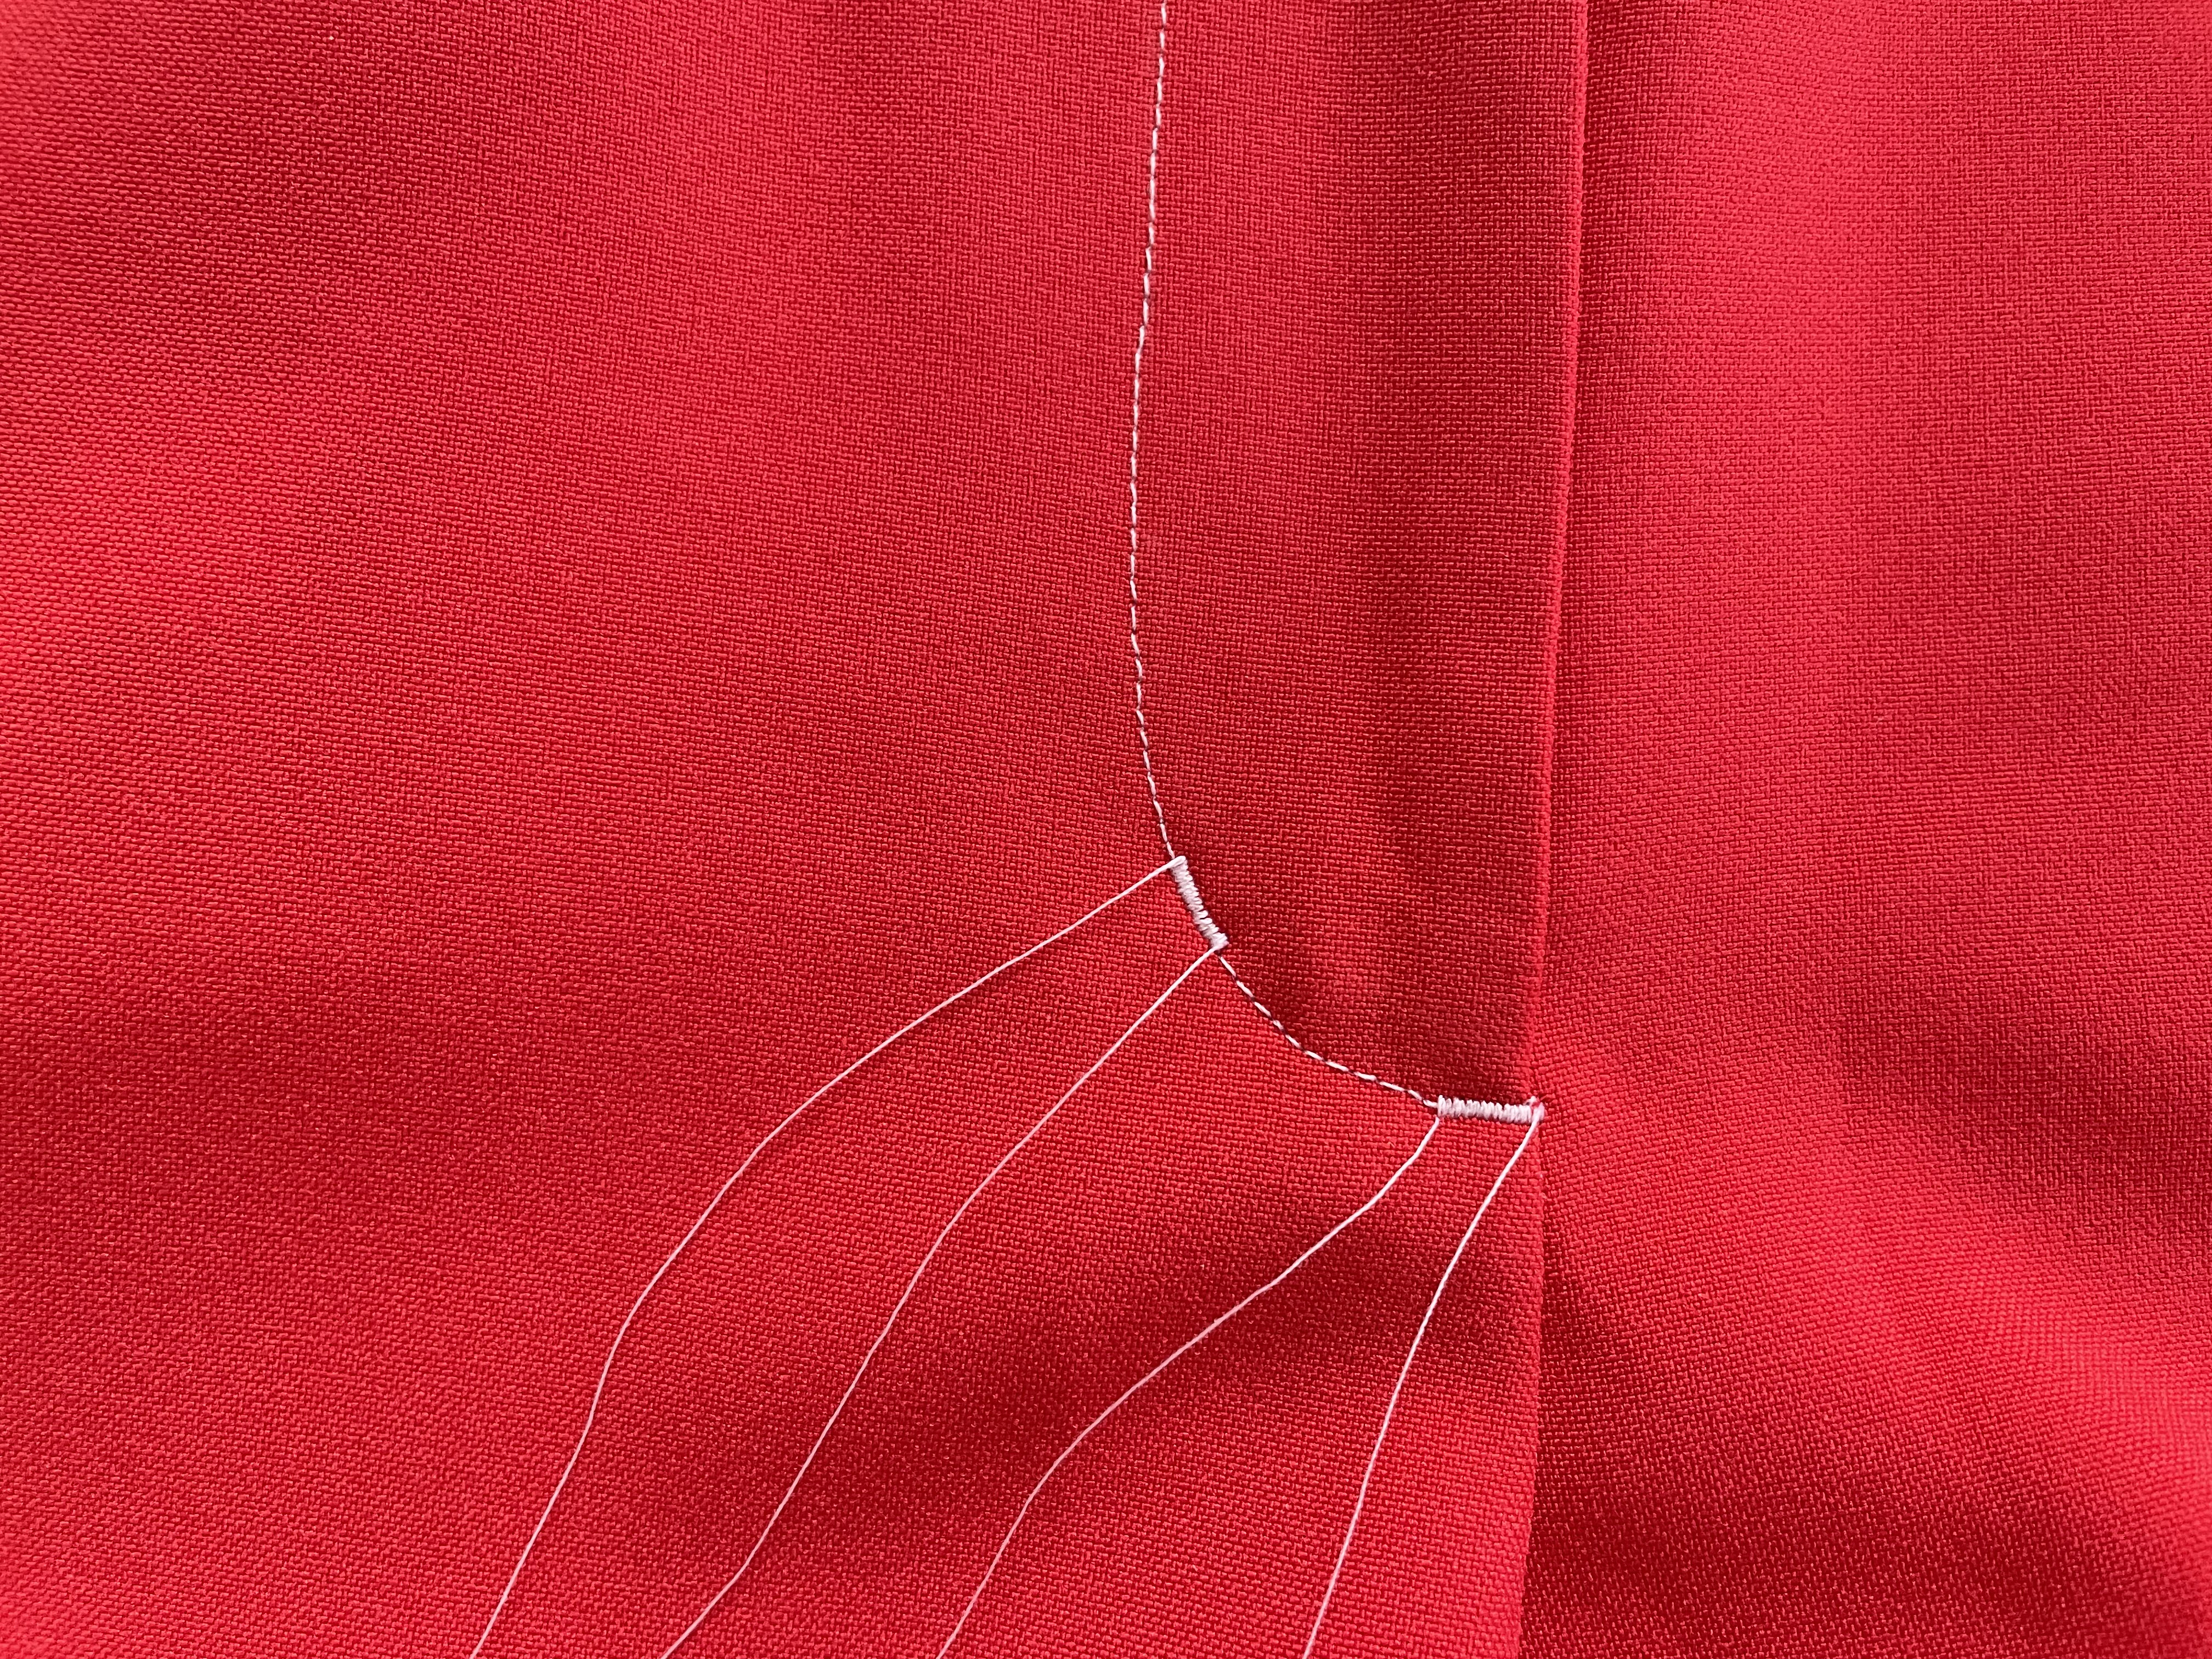
Using zipper foot, stitch from fly bottom to top, following chalk line. Do not backstitch at the beginning and leave a thread tail. TIP: check to make sure that the needle will not hit the zipper bottom stop.

Pull thread tails to the back side and tie into knot.

Take out all basting stitches.

On left front, make a 1/4" clip at large dot.

Press under 1/4" above clip. This is the underlap side.

With the pant fronts WRONG side up, flip the zipper tape up. Place the underlap on top of the fly facing.

Place zipper tape down on top of the underlap side. Pin temporarily on wrong side.

Turn pants RIGHT side up. Remove pins from the WRONG side and pin left front folded edge over zipper tape close to the coil.


Baste underlap in place. Then add the fly guard underneath the zipper.

I forgot to take a picture of the fly guard in place before stitching it. Here is a picture of the placement. The serged edge of the fly guard should be lined up with the edge of the zipper tape.

With the pants RIGHT side up, edgestitch next to zipper teeth, stitching from top to bottom. This will catch both the underlap and the fly guard. I use a seam ripper to help hold the fly facing out of the way. (NOTE: usually we stitch all zipper seams the same direction, from bottom to top. In this case, we break our rule to make it easier to stitch down into the corner of the zipper bottom stop.)

Pull thread tails to the back side and tie in knot.

Remove all basting stitches.
Mark where bar tacks should be stitched.

Test out the small zigzag stitch on scrap fabric. I chose 1.4 stitch width and .4 stitch length for the small bar tacks.

Stitch bar tacks in stress areas. Don't make them too long. Mine are less than 3/8" long.
Pull all thread tails to the back side and tie in knots.

PANTS BACK
Staystitch upper edge of back at the waist if it is curved. Pin and sew the back darts. (Note, the slim and average pants back will have two darts. The curvy pants back will have four darts for more shape.

Stitch the dart from the wide end to the point. To prevent a "bubble" at the point, when you are 1/2" from the point, shorten stitch length and stitch the last few stitches right on the fabric fold. Leave thread tails to tie a knot. Do not backstitch at the point.

Press the dart flat along the stitching to meld the stitches. Do not press below the stitching.

Then press dart toward the center back, pressing over the pressing ham.

TIP: To help prevent an "indent" from the fold of the dart, add an envelope or sheet of paper folded in half and place it between the dart and the pant fabric. Then press the dart to the side.

FOUR-PIECE WAISTBAND INSTRUCTIONS (See Headings below for instructions for the two-piece waistband and 1-piece rectangle waistband.)
(The four-piece waistband needs to be basted to the pants before the pants can be pin fitted.)
Cut interfacing for front and back waistbands, Trim off 1/2" all around the interfacing.

On the front waistbands, trim the front corners diagonally.

Pin fusible interfacing to WRONG side of left front waistband, right front waistband and back waistband sections.
Press interfacing to waistband pieces. it is best to label each of the waistband pieces to avoid confusion.
Press interfacing to waistband pieces. it is best to label each of the waistband pieces to avoid confusion.

Check to make sure that the two zipper fronts match up. Trim if necessary.

For fitting purposes, the waistband seams, inseams, and side seams will all be sewn using a long basting stitch. This will make it easier to unpick.
With RIGHT sides together, pin right front pant to right front waistband, matching centers.
With RIGHT sides together, pin right front pant to right front waistband, matching centers.

At the zipper front and fly guard front, the waistbands should lap over 5/8". You may notice that the waistband over the underlap will be less than 5/8". Just make sure there is at least 1/4" for a seam allowance.

Pin the back waistbands to the back pants.

Baste waistband seams at 5/8".

Put pant backs right sides together and pin. Baste back crotches together, but leave the last 2" next to the inseam unstitched. This Simplicity pattern has a seam allowance of 5/8" at the inseam but ends at 1" at the waist. This is for fitting purposes.


This Simplicity pattern also has a fitted stride in the back leg inseam. The seam allowance at the crotch is 1" but blends to 5/8" at the mid thigh. It has been marked with chalk.

With pants wrong sides together, pin the side seams and inseams, with the pins pointing downward.
Notice the front inseam is 5/8" but the back inseam has been offset at the crotch because of the extra stride amount. This is for fitting purposes, just in case they need to be let out for more stride. Your pant pattern may not have this feature.

Pants have been pinned wrong sides together. This is so that the pants can be fitted to the body, with right pant fitting right hip and left pant fitting left hip. Some figures require difference seam allowances on each side of the body.

Try on the pants and check fit, both front, and

back. Pants can be tapered all the way to the waist because of the four-piece waistband. Adjust pins if necessary.
Fit the pants in this order:
- adjust the fit of the waistband
- check the inseams and the side seams
- check the center back seam

Once fitted, waistbands can be permanently stitched.

Seams are pressed towards waistband.

Trim and grade waist seam allowances.

Stitch back crotch together, lining up waist seam.

Press seams towards the waist.

Continue to leave the last 2" unstitched at the inseam. This is because the inseams will be stitched before finished the curve of the crotch seam.

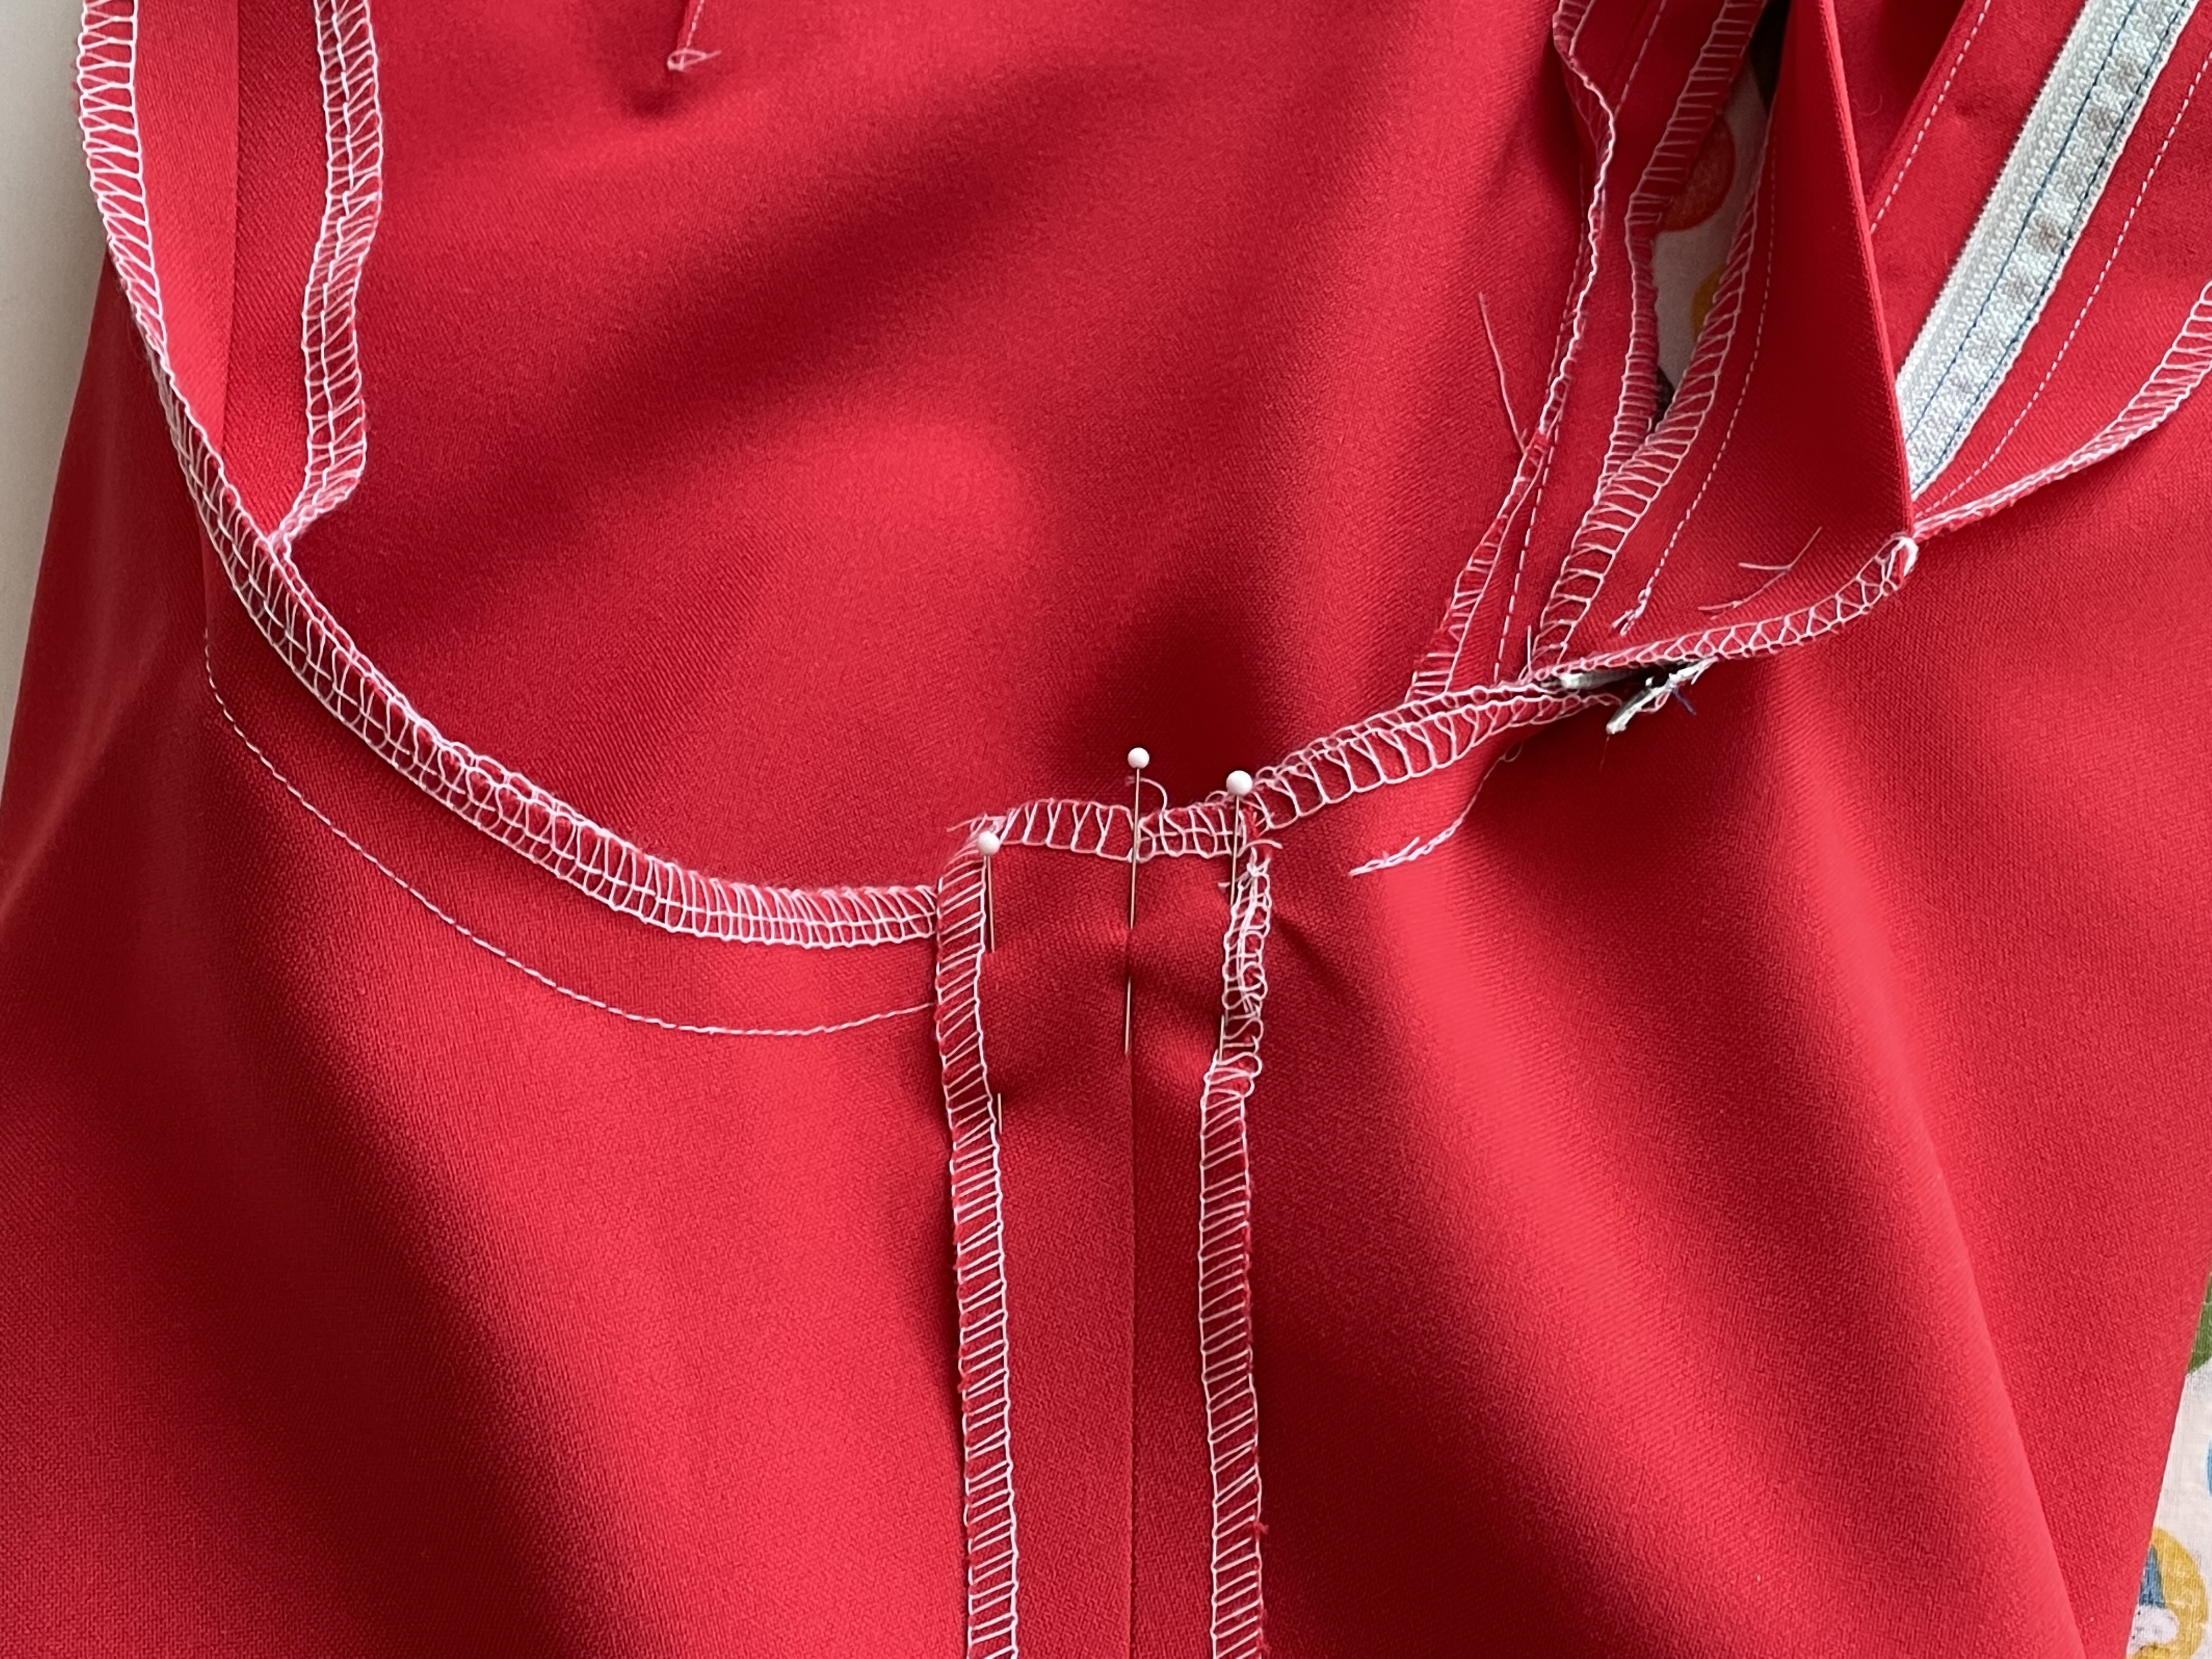
Pin the inseams together, front and back RIGHT sides together. Notice the back stride extends out 3/8" at the crotch. Your pattern may not have this.

Side seams and inseams have been pinned right sides together and are ready to be sewn.

Sew inseams and side seams with RIGHT sides together.

Make sure that the waistband seams match at the side seams and center back seam.

Serge each raw edge separately. Seams will all be pressed open on tailored pants. The 3-thread serger stitch is best.


Press seams open and use clapper pressing tool.

Turn pants inside out and put one leg inside the other. Pin the inseams together, matching seam, with seam allowances open.
To reinforce, stitch crotch seam again. "Stitch the SMILE twice."

FINISHING THE FOUR-PIECE WAISTBAND
If you made any alterations to the side seams of the pants, remember to do the same amount to your waistband facing side seams.
Pin back and front waistband facing sections RIGHT sides together at notches.
If you made any alterations to the side seams of the pants, remember to do the same amount to your waistband facing side seams.
Pin back and front waistband facing sections RIGHT sides together at notches.

Stitch center back and side seams of waistband facing sections along seam line or newly marked seam line.

Trim seam allowances on waistband facing.

INSTRUCTIONS FOR BOTH FOUR-PIECE AND TWO-PIECE WAISTBANDS
The lower edge of the waistband is convex. Trim off 3/8" of waistband facing bottom.

Enclose trimmed lower edge of waistband facing with double fold bias tape for a professional finish. Identify the more narrow side of the bias tape.

This narrow side will be sewn to the right side of the waistband facing, stitching on the fold line. Pin single layer of bias tape to RIGHT side of waistband facing.

Stitch bias tape to waistband facing, using the crease as a stitch guide.

Then fold over the double fold bias tape to the waistband facing WRONG side and pin in place. Topstitch on the bias tape with the waistband facing RIGHT side up.

With RIGHT sides together, pin facing to waistband, matching centers and side seams.

At the center fronts, notice where the zipper and fly guard end.

Mark where the front stitching lines will be on the front of the waistbands.

Place outside waistband right side up. Then fold back the fly zipper and pin out of the way.

Pin outside waistband to waistband facing.

Now do the same thing to the underlap side. With outside waistband RIGHT side up, fold back the fly guard and pin out of the way.

Pin outside waistband to waistband facing.

Begin stitching at the waist stitching, 1" from the front edge. Pivot at corner.

Continue stitching along the marked line.

Pivot at top corner, and continue stitching across the entire top of the waistband.

Finish stitching the opposite waistband corner the same way, ending 1" on the bottom waist stitching.

This is what it will look like at the waistband left front after stitching.

This is what it will look like at the waistband right front after stitching.

Turn the waistband corners RIGHT side out and check for accuracy. If everything looks good, trim and grade seam allowances. If not, make any adjustments.

Clip top curve of waistband.

Understitch top of waistband facing. (Or you could topstitch the entire waistband after hand stitching.)

Here is finished understitching.

Roll waistband to facing side and press seam edge.

Push out corners with turning tool.

Place waistband over a pressing ham. Pin facing to waistband seam allowance. Keep layers smooth.

Flip up the bottom edge of waistband facing. This is where you will hand blindstitch to the seam allowance.

Notice where the binding is hidden near the zipper.

Blindstitch the waistband facing to the seam allowance only, keeping stitches 1/4" apart.

TWO-PIECE WAISTBAND
These instructions are for the two-piece waistband. Previous to sewing on the waistband, the pant fit should take place, and the side seams and inseams sewn and seam finished. Then sew up the crotch to within 2" of waist. See instuctions above.
Cut out four waistband pieces: two for the left side and two for the right side.

Cut two of interfacing. Trim off 1/2" around all four sides.

Apply interfacing to wrong side of left and right waistband pieces.


Leave the back crotch unstitched for the top 2".

Pin the interfaced waistbands to the pants, right sides together. (Note: the convex curve of the waistband is the edge that is matched to the pant waist and pinned.

Make sure that at least 1/4" of the waistband is beyond the zipper and zipper shield so that there is enough fabric to finish off the waistband CFs.

Sew on the outside waistbands.

Press the waist seam up towards the waistband. It is helpful to do this over a pressing ham. Also press on the right side.

Stitch back crotch together, lining up waist seam. Stitch back seam, keeping waist horizontal seams matching. Press seam open.
Pin the two waistband facing pieces together at CB. If fitting changes were made to the CB of the pants, do the same seam allowance for the facing.

Trim the CB seam and press open.

NOTE: FINISH THE TWO-PIECE WAISTBAND FOLLOWING FOUR-PIECE WAISTBAND INSTRUCTIONS ABOVE.
ONE-PIECE RECTANGLE WAISTBAND
Before starting the rectangle waistband, make sure that the pant fitting is finished, and that side seams, inseams and back crotch seam have all be stitched, seam finished, and pressed open. See above for instructions.
Cut out one rectangle waistband.

Cut out one waistband interfacing.

Press waistband in half lengthwise, wrong sides together.

On the waistband facing side, mark and trim off 3/8".

Enclose trimmed lower edge of waistband facing with double fold bias tape for a professional finish. Identify the more narrow side of the bias tape.


Stitch bias tape to waistband facing, using the crease as a stitch guide.

Then fold over the double fold bias tape to the waistband facing WRONG side, press, and pin in place.

Topstitch on the bias tape with the waistband facing RIGHT side up.

Make sure the pant back seam is sewn all the way to the waist.

Pin waistband to top of pants, right sides together.

Make sure that at least 1'4" of the waistband is beyond the zipper and zipper shield so that there is enough fabric to finish off the waistband.

Make sure that both front waistbands meet horizontally at CFs.

Sew waistband seam.

Press waist seam towards waistband.

Also press waistband on the right side.

Make sure that at least 1'4" of the waistband is beyond the zipper and zipper shield so that there is enough fabric to finish off the waistband.

At center front, fold waistband in half, right sides together, and pin in place. Draw in stitching line so that it can be stitched accurately, and squared at the corners. Sew on stitched line.

Trim sides and corners of seams.

Turn waistband corners right sides out and use point turner tool to open up corners.

Notice where the binding is hidden near the fly zipper overlap.

Pin the waistband to the seam allowance, just above where the waist seam is.

Flip up the bottom edge of waistband facing. This is where you will hand blindstitch to the seam allowance.

Blindstitch the waistband facing to the seam allowance only, keeping stitches 1/4" apart.

HEM
There are several choices for the pant hem. If the fabric is more casual, a double fold topstitched hem is appropriate. This pant fabric is dressy, so an invisible hem is appropriate. One leg will demonstrate the machine blind hem, and the other leg will demonstrate the hand catchstitch.
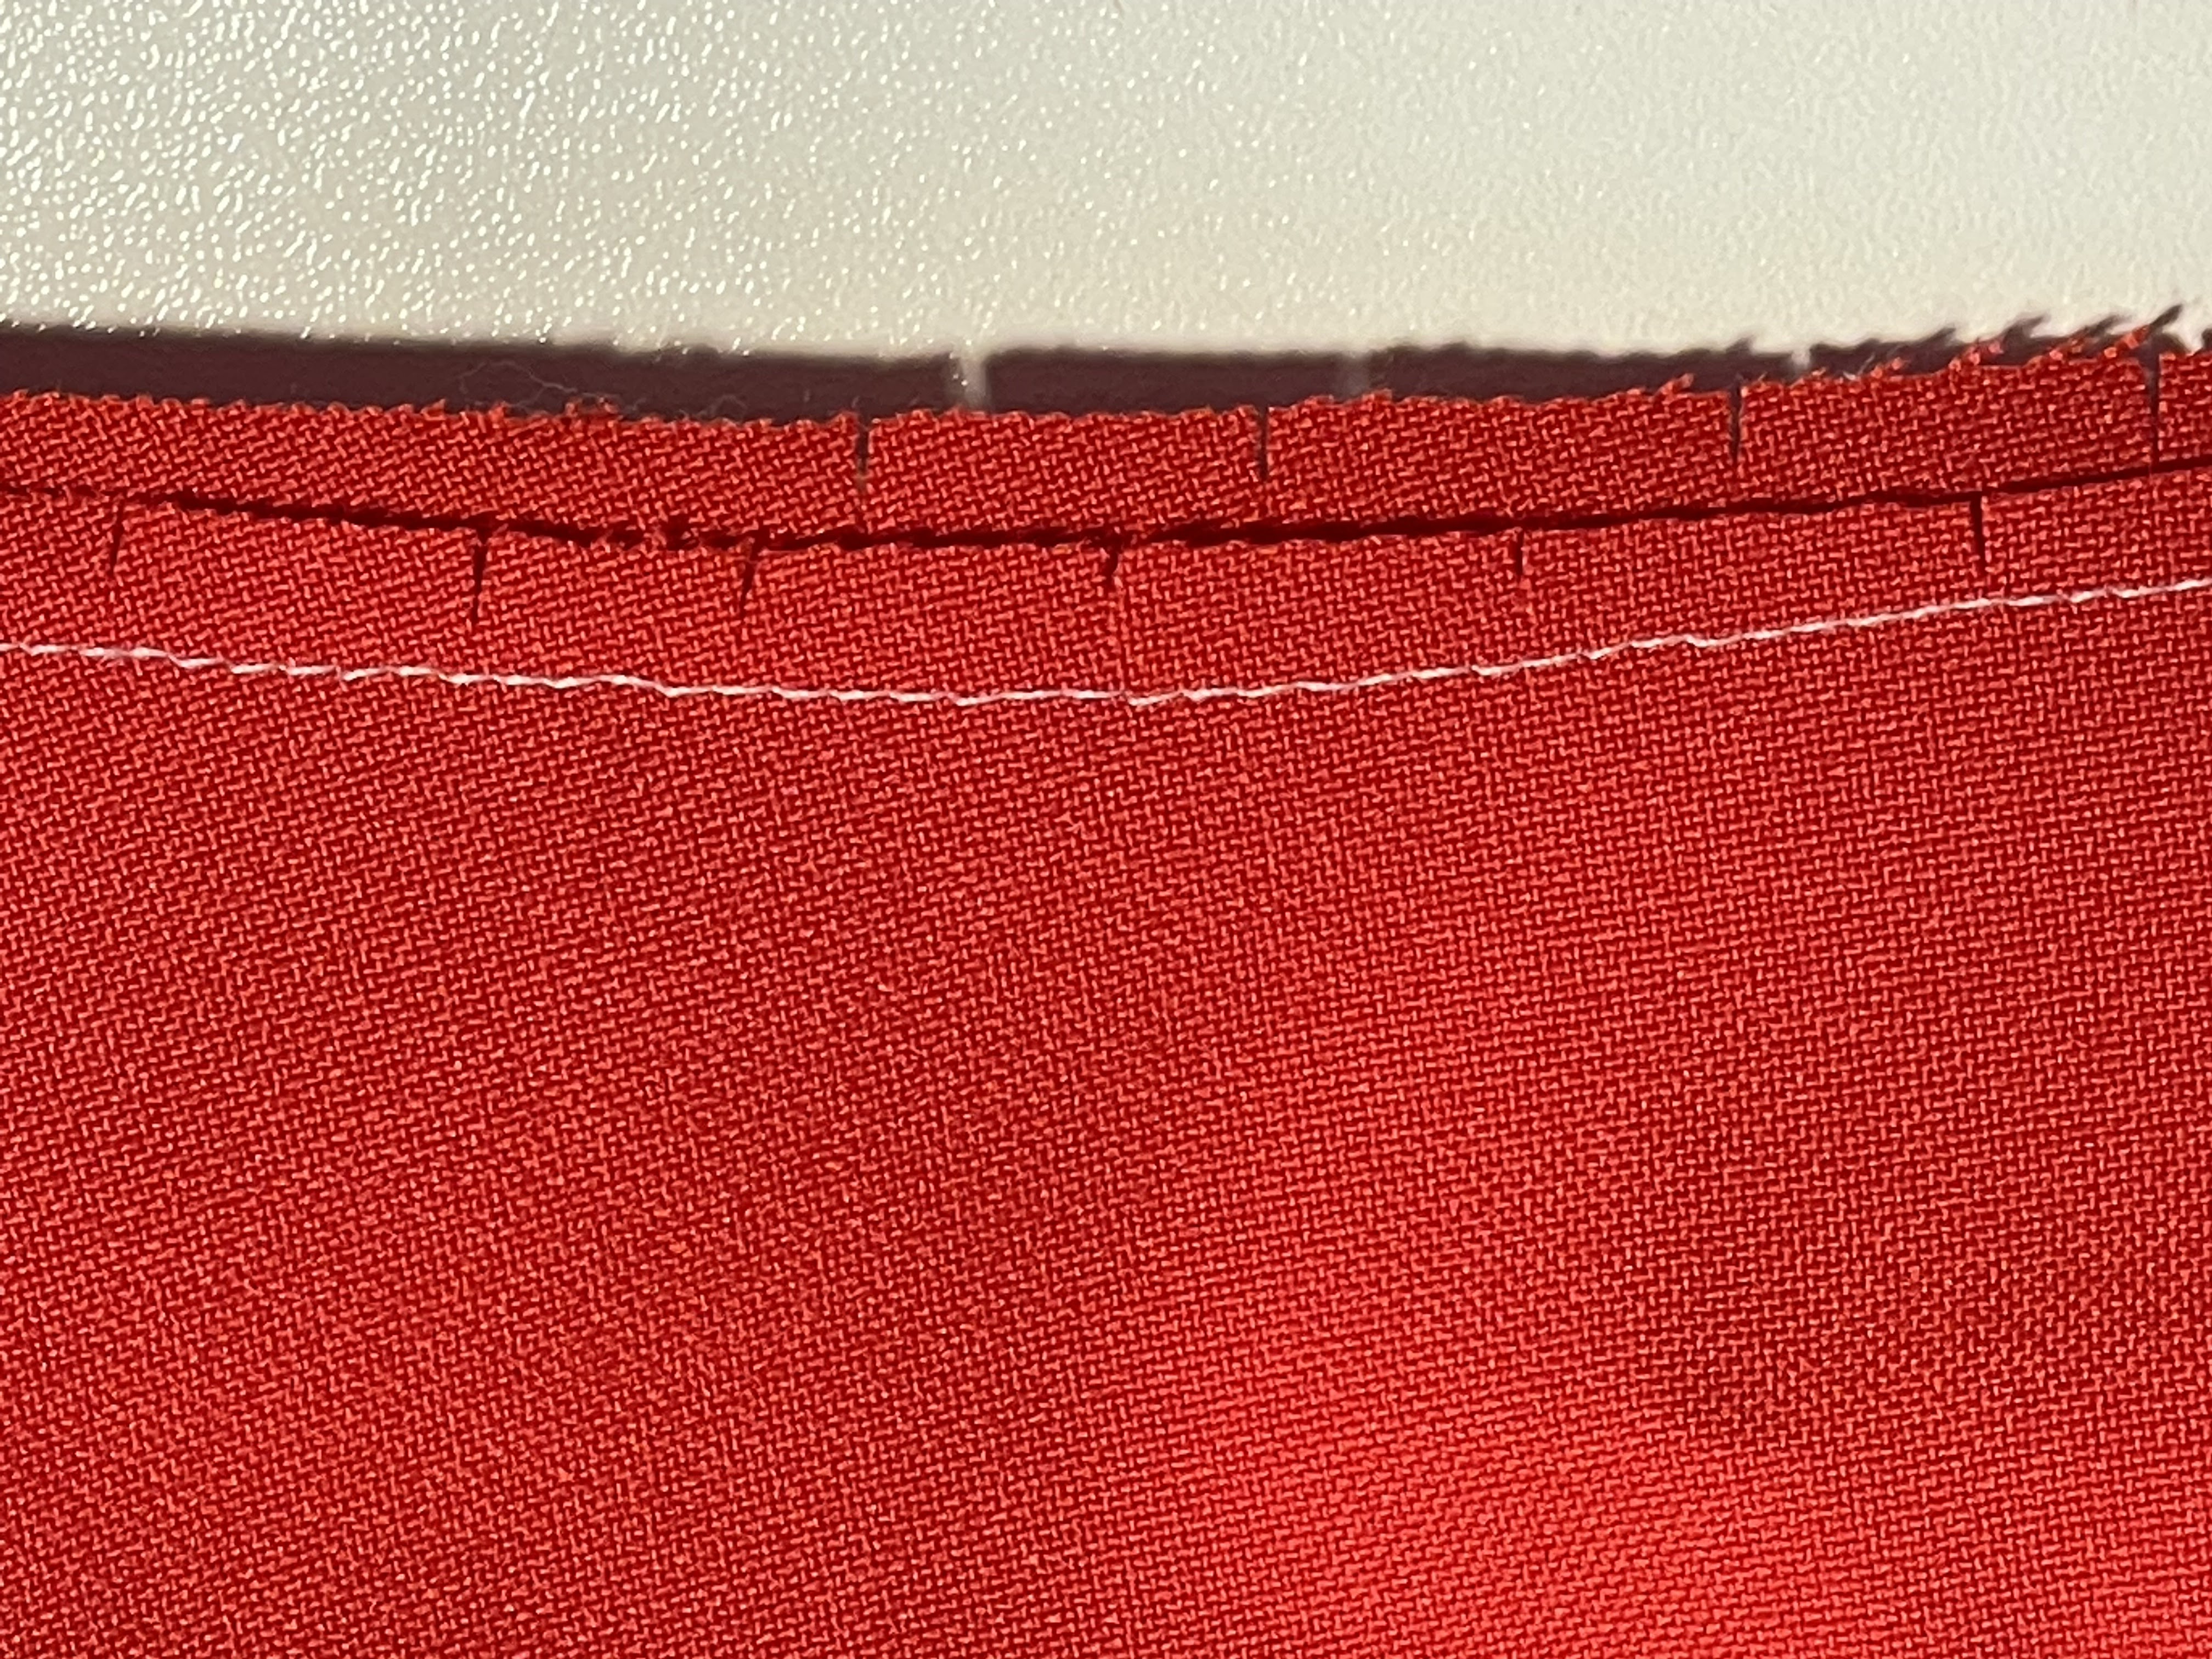
This pant leg has lace tape stitched on to enclose the raw edges.

This pant leg has a 3-thread serger stitch to finish off the raw edges.

Finished edge with lace hem tape. Could also use fabric hem tape.

Fold up hem allowance according to pattern instructions and pin in place.
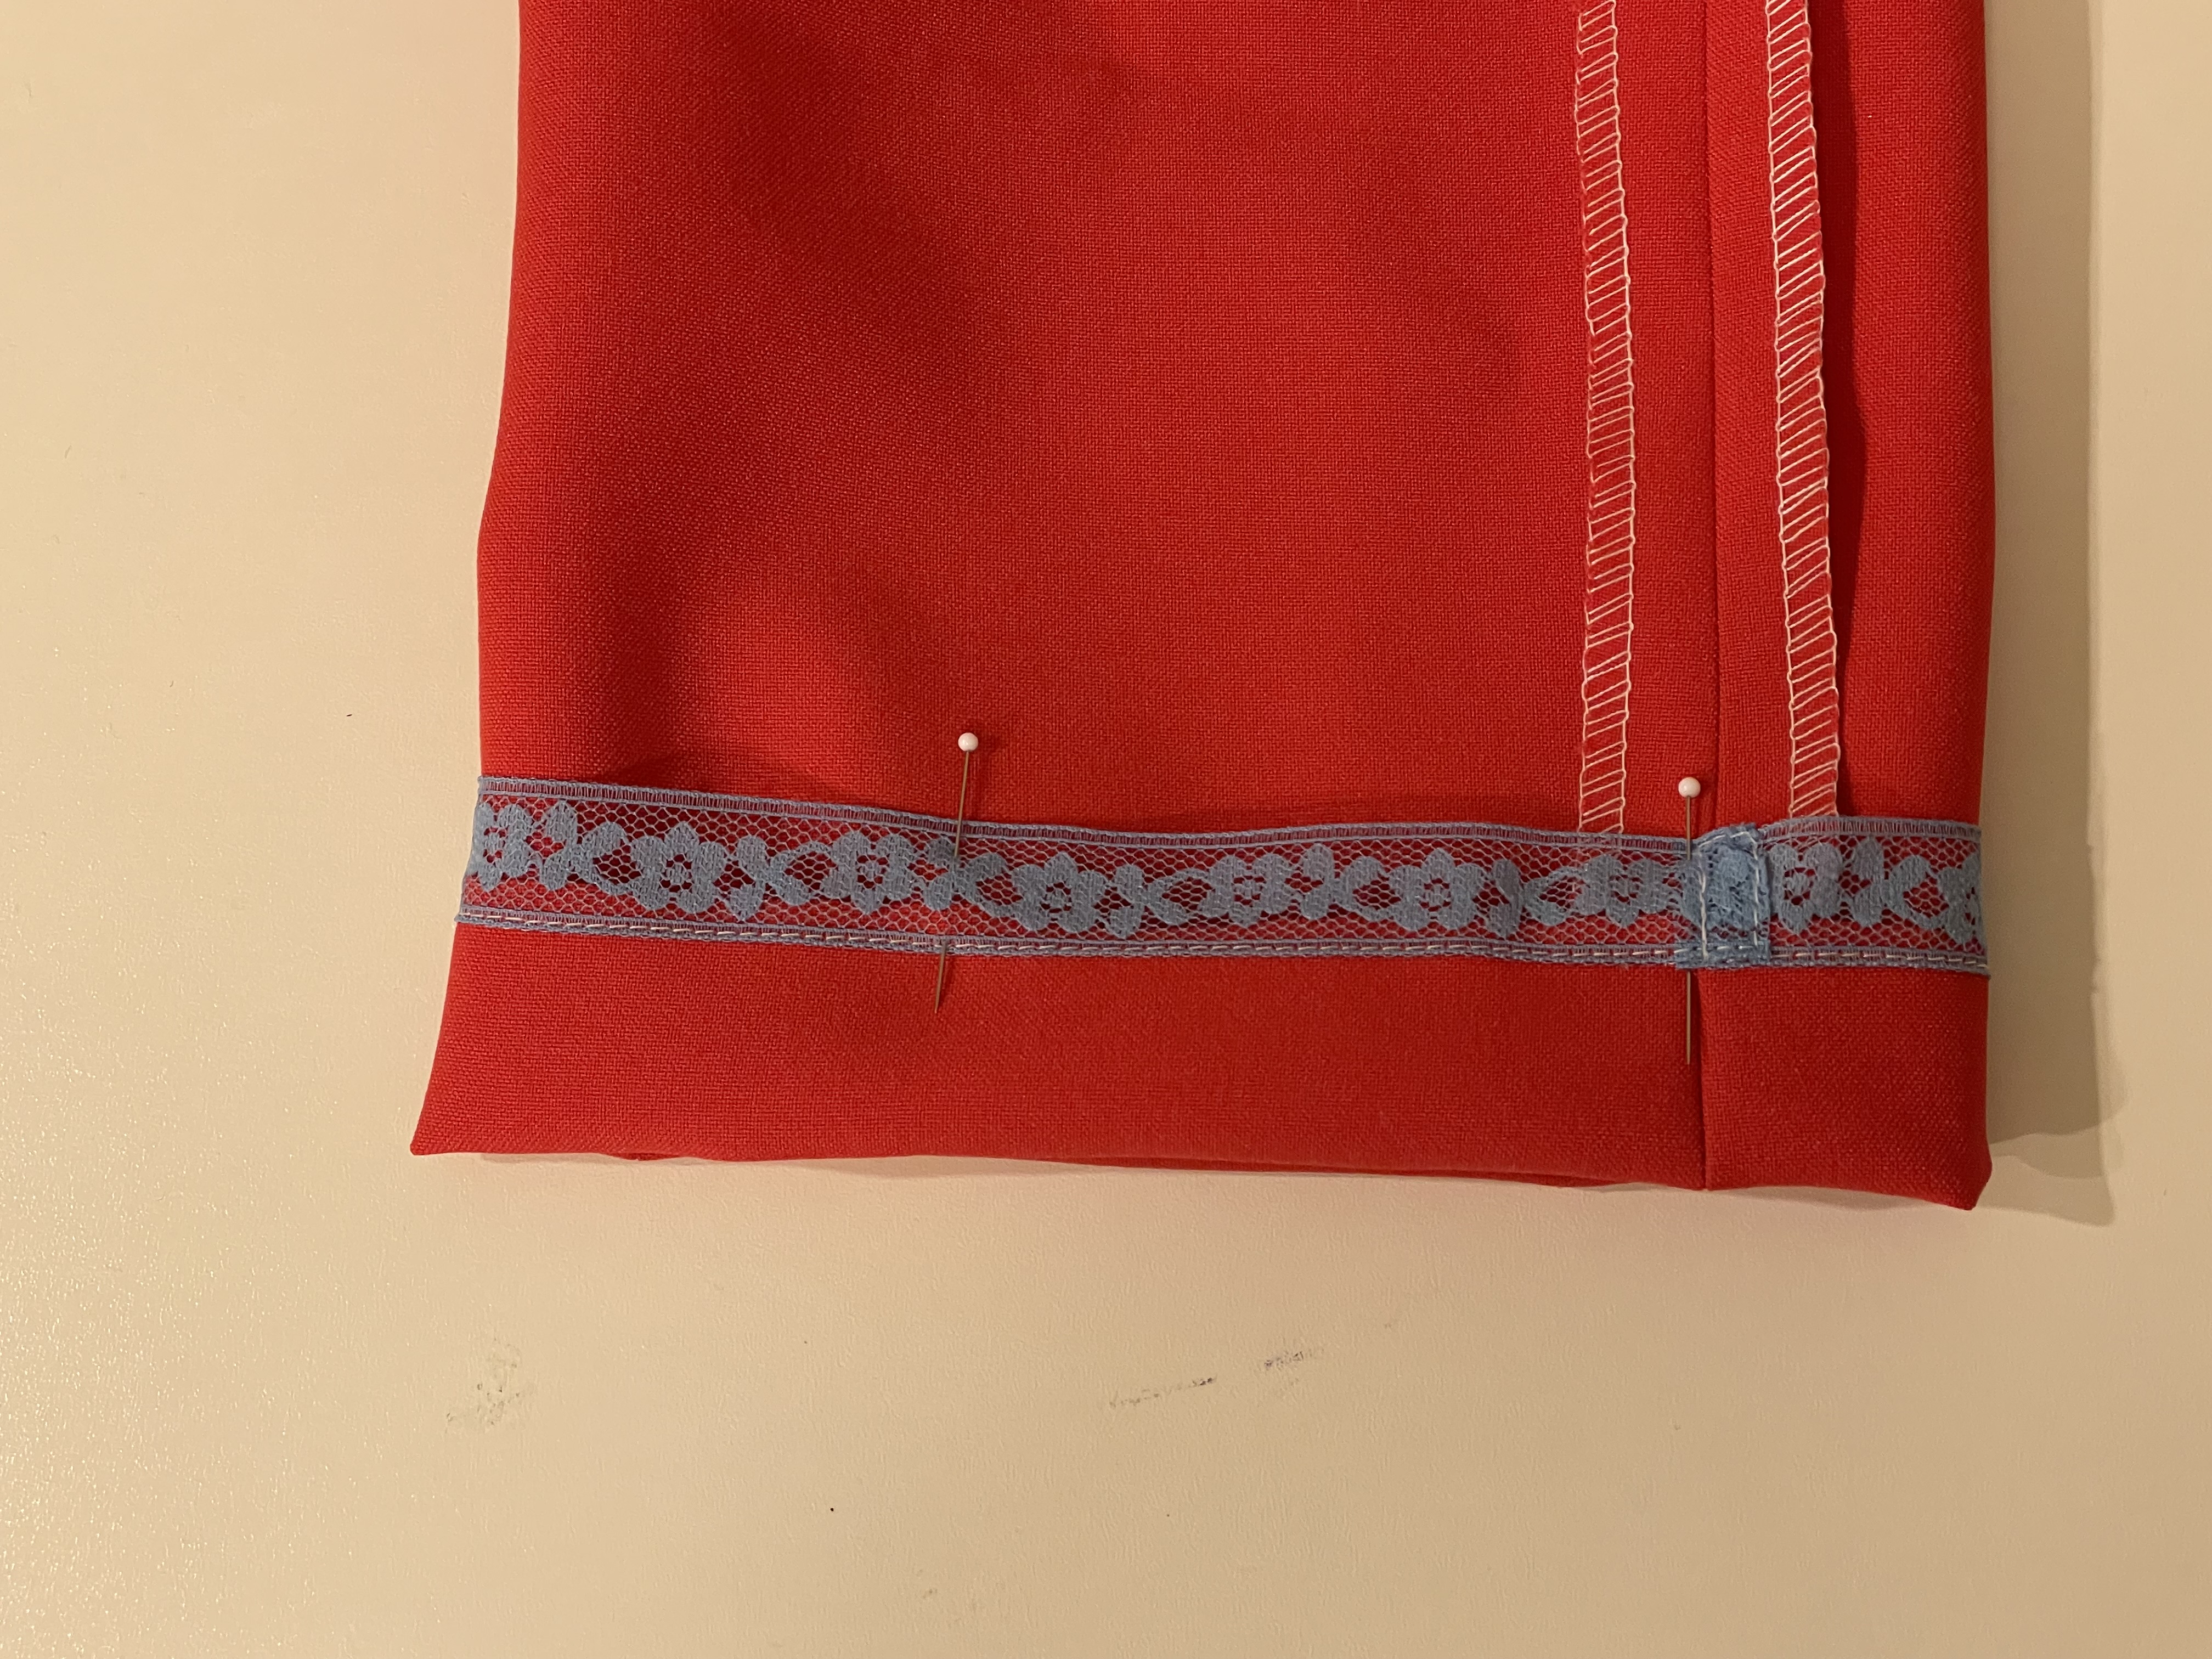
This hem allowance is 1 1/4".

Blind hem stitching using Bernina blind hem presser foot. Make sure that the stitch through the hem is small so it will be hidden on the right side.

Hand catchstitch hem.

WAISTBAND CLOSURE
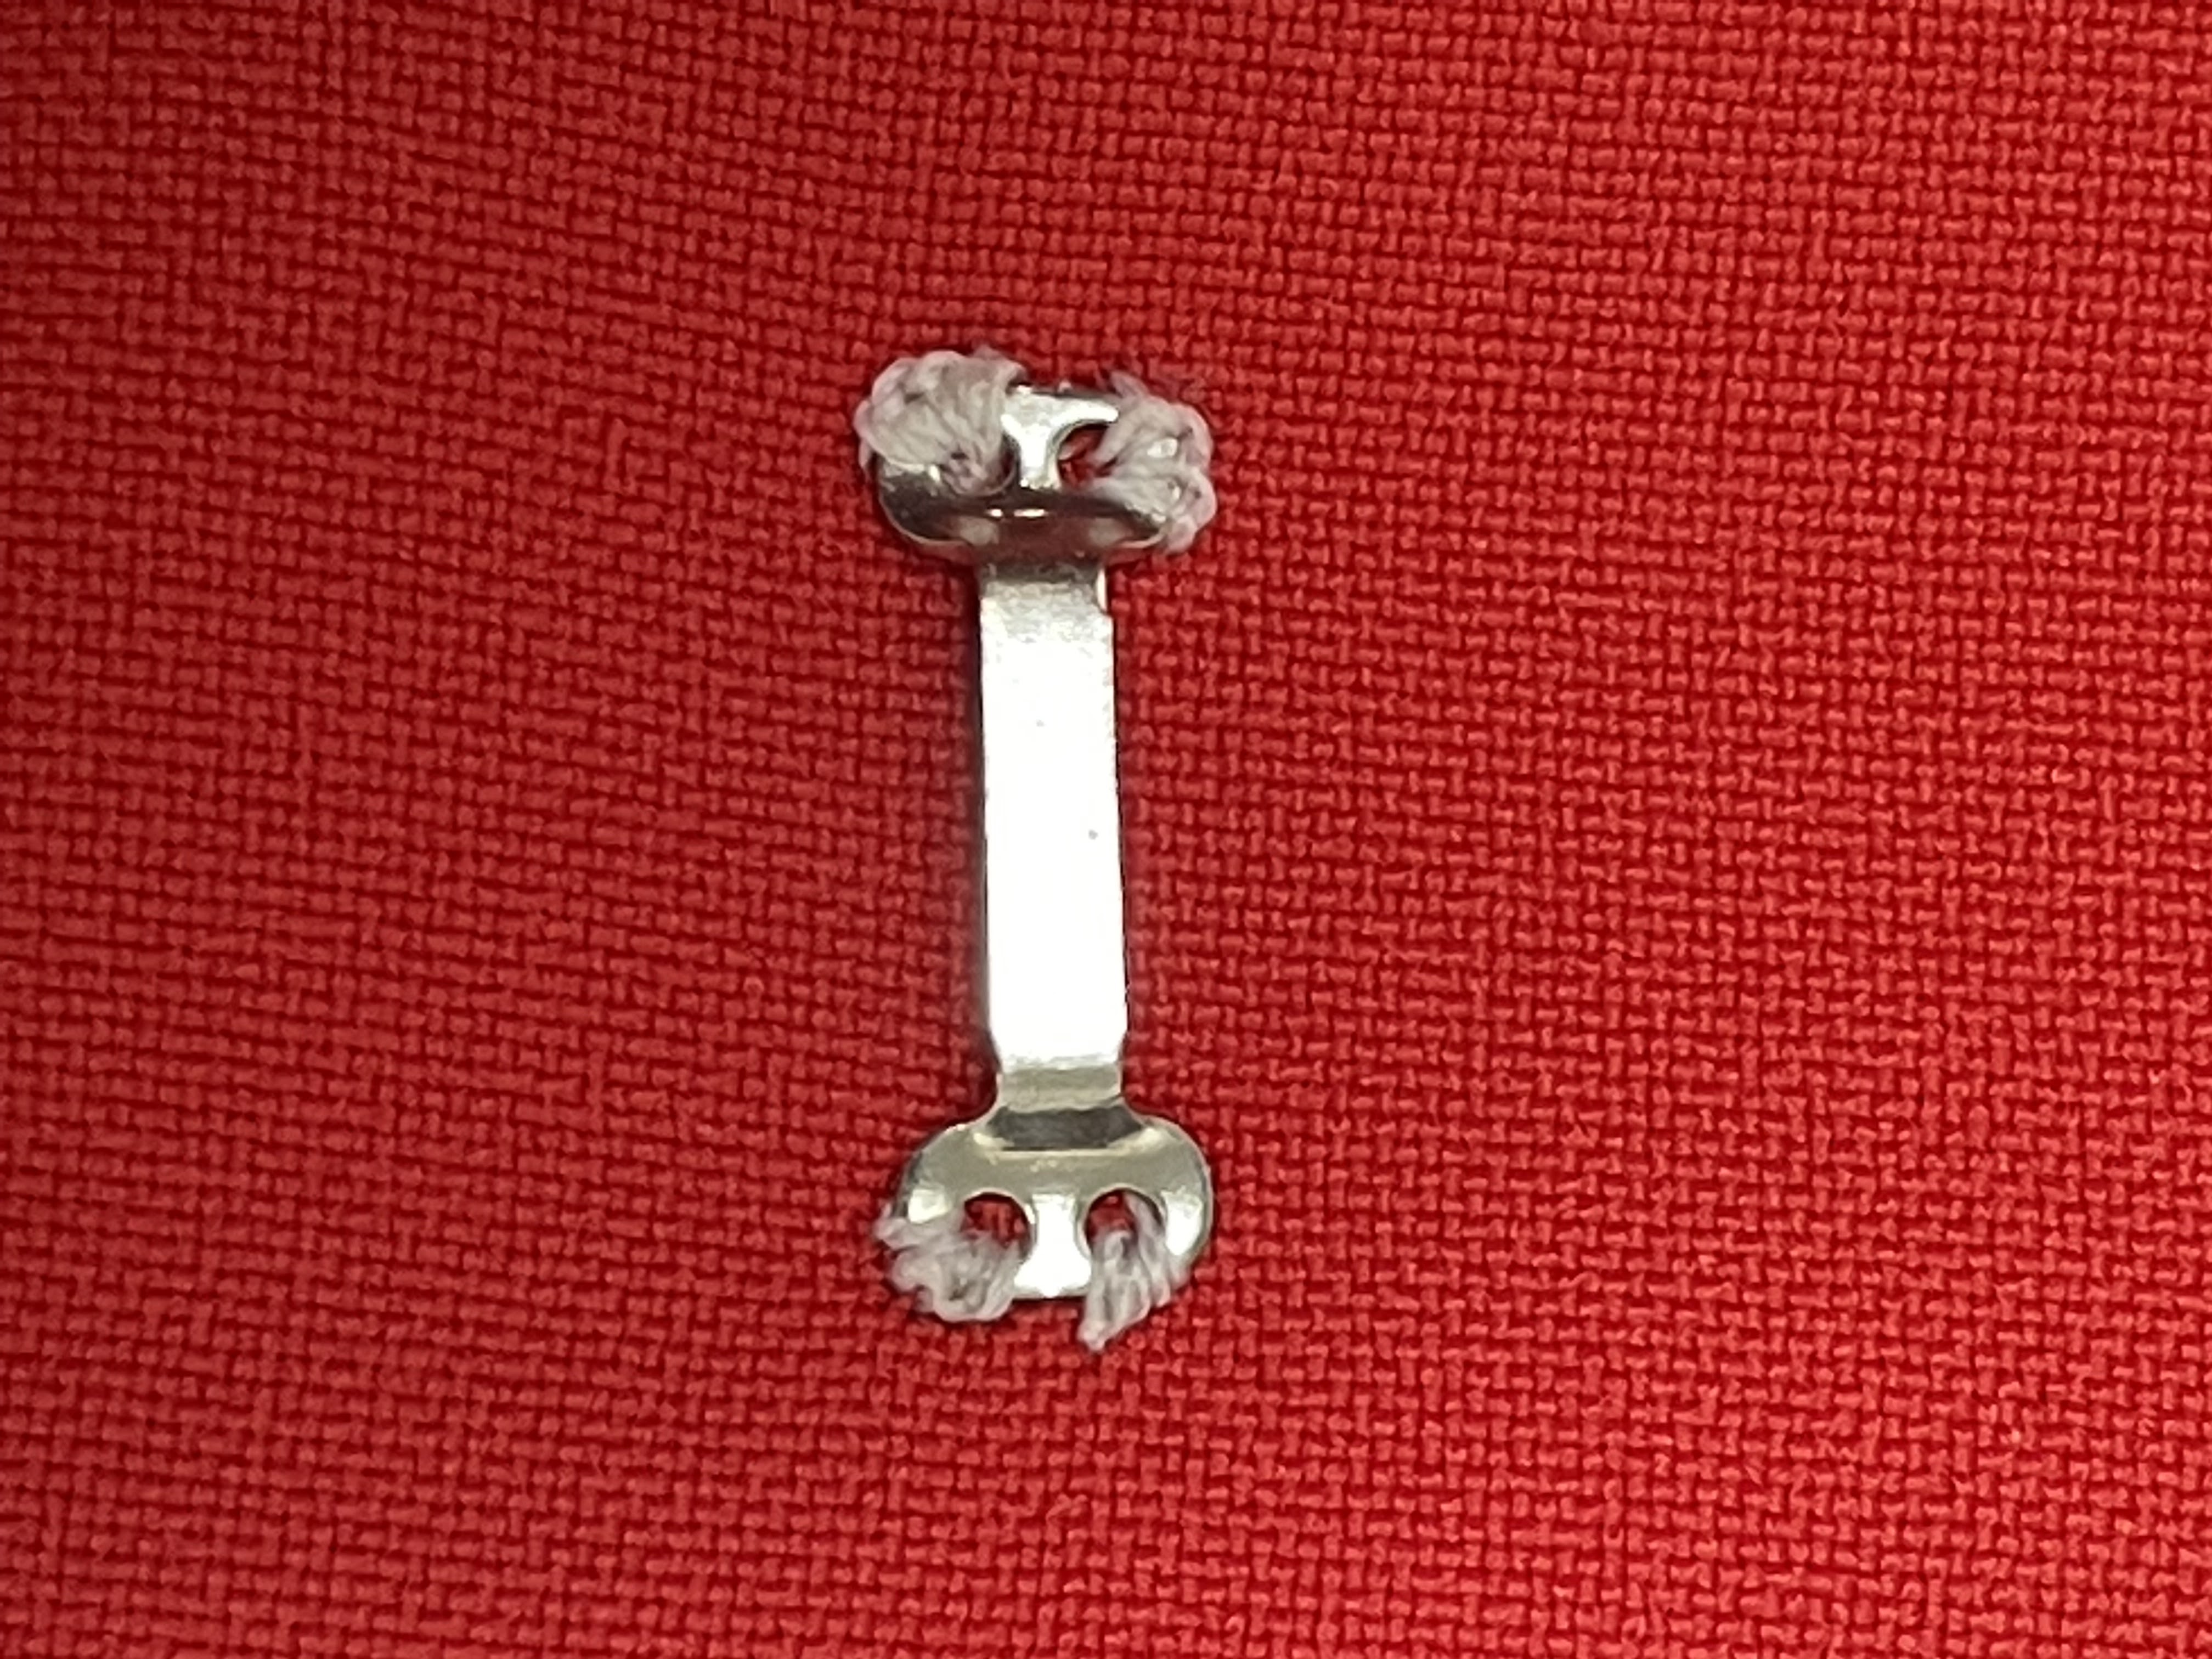
Use a skirt hook and eye. The hook should be sewn first and should be placed 1/4" from front edge on WRONG side. Use the buttonhole stitch. Some of the stitches should be sewn through to the outside waistband for strength. Try to keep these stitches small and hidden on the RIGHT side.

Finished hook.

Close zipper and overlap waistband for the "eye" placement. Place a pin where the "eye" should be sewn.

The "eye" can be sewn through both fabric layers, using the buttonhole stitch.
PRESSING

Press the bottom hem using a pressing cloth.

Add the clapper pressing tool. This will give a crisp and professional edge.

Optional: add a pressed edge on the pant legs from hem to crotch. Pin pant leg together matching the seams. Keep fabric layers smooth.

Press one side of the leg at a time using a pressing cloth. Depending on the shape of the leg, the fabric may not all lay flat at the same time.

Also use the clapper pressing tool for a crisp, more permanent edge.

Press all the way up to the crotch area.

Then press the same way on the other side of the leg.

Once both legs have been pressed, put legs together. Line up both the hems and the waistband.

Press a crease with both legs together. This will ensure that the crease ends at the same spot for both legs.

Do the same for both the front and back of the pants.

Great job with your pants. Enjoy wearing them.
***SEW***CREATE***LIVE***
***********
*******
***
*
TAGS: tailored pants, men's tailored pants, women's tailored pants, fly zipper trousers, tailored trousers, men's tailored trousers, women's tailored trousers, lined pockets on trousers, contour waistband on pants, Simplicity 1696, S1696