

Before cutting out, check body measurements for various sizes, also comparing the finished garment measurements for the added ease. This will ensure that you pick the size that best fits you. Adjust waist and hip width accordingly, and check skirt length.
Follow layout instructions on pattern. This pattern has the front skirt pattern on the fold. I have placed the waistband pattern on the double fabric for placement, but will not cut it out until the other two pieces have been cut out, because I only need to cut one of the waistband.

Showing all three pieces cut out.

Transfer dart markings to wrong side of fabric with tracing paper.

Trace darts. I like to draw a horizontal line at the bottom of the darts to indicate where the dart ends. This helps me to be accurate when sewing.

Cut out the same skirt pieces out of lining. Do not cut the waistband out of lining.

Since darts will be made into tucks instead of sewn darts, just snip at the dart opening.

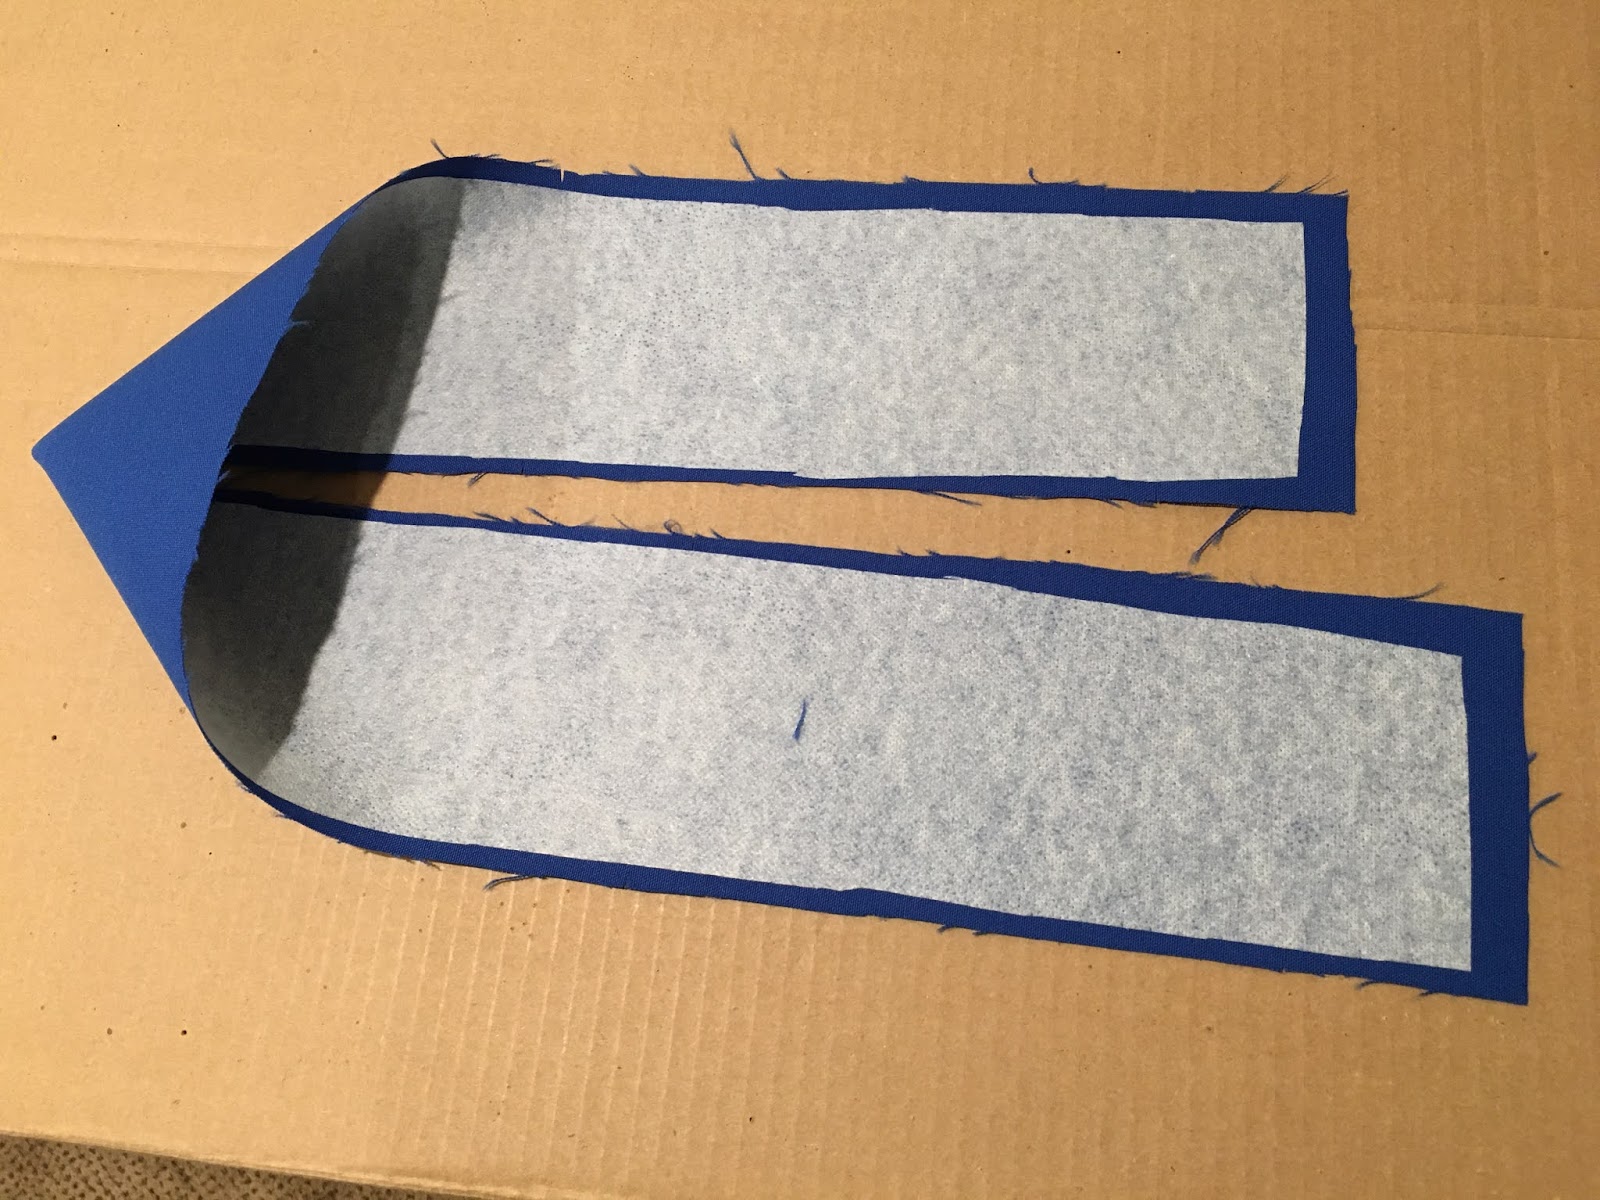
Cut out one waistband in fusible interfacing. Then trim 1/2" off sides and top of folded waistband.

Fuse interfacing to wrong side of waistband.
Pin darts right sides together, matching markings. Notice I put the bottom pin perpendicular to the fabric fold, indicating the bottom of the darts.

Sew darts from the widest to the point. Do not backstitch. Instead, 1/2 from point, shorten stitch length to 1.5 and stitch last two stitches exactly on the fold. Then leave 3" thread tails and tie in a double knot. Clip threads to 1/4".

Press darts flat to embed stitches into the fabric. Do not press below dart point.

With a pressing ham, press darts towards center front (CF) and center back (CB). Do not press beyond dart point.

INVISIBLE ZIPPER
I am using an invisible zipper for the center back closure. The invisible zipper is designed with the zipper coil on the wrong side of the zipper to conceal it. The zipper in the top of the picture is right side up and the zipper in the bottom of the picture is wrong side up to illustrate.

To prepare the zipper, turn the iron on to a cool setting. Open up the zipper and turn the tape to the wrong side. Uncurl the coil with your finger to see how it moves. This is how you will press the zipper to relax and open up the curled coil.

On the wrong side of the zipper tape, press open the zipper coil.

There are many different kinds of invisible zipper feet. Try to find one that will fit your sewing machine. I have a Bernina machine and they make a very nice invisible zipper foot. The invisible zipper foot I have is a generic snap-on invisible zipper foot (see picture at left.) I use it with my Bernina adapter shank. The presser foot in the right picture is the Bernina snap-on zipper foot. You will need to use both an invisible zipper foot and the regular zipper foot for this application. If you do not have an invisible zipper foot, you can still use the regular zipper foot for the application. It is just more challenging to sew close to the zipper coil accurately.


Before sewing the zipper in, do a seam finish on the center back skirt raw edges. I have serged the raw edges. Do not trim any fabric off so that the seam allowance remains 5/8". Place the left skirt back right side up. Measure down 1" and place a pin to mark it.

The zipper tape is 1/2" wide and the skirt seam allowances are 5/8". Because of this, place the zipper tape 1/8" in from the edge of the serged edge. The zipper top stop is placed 1" down from the top raw edge, just where the pin mark is. Pin in place with the pins pointed towards the top. Notice that the zipper coil is towards the middle of the skirt fabric.

Starting at the zipper top stop, backstitch and then stitch down to the zipper slider and backstitch again. Adjust your needle position so that you are stitching close to the zipper coil. It is important to make sure that the zipper coil is standing straight up, not curled down. The special invisible zipper foot has grooves on the bottom that will help guide the zipper coil. Close the zipper and check that you stitched close enough to the coil to conceal the zipper tape.

With the zipper closed and the skirt right side up, place the back right skirt piece right side down, with the top waist raw edges matching. Begin to pin the right side of the zipper tape to the right side of the skirt back. This will ensure that the two back skirt pieces are lined up with each other.

Open the zipper and finish pinning the zipper tape to the skirt center back.

Notice that now the skirt fabric is to the right of the presser foot and that the zipper coil is in the right groove of the presser foot. Once again, start at the top stop and backstitch. Then stitch forward to the zipper slider and backstitch. Close the zipper once again and check to see if the zipper is concealed. If there is still zipper tape showing, stitch again a little closer to the zipper teeth.

With the skirt backs together, pin the rest of the center backs together.

Put the regular zipper foot on the sewing machine and adjust the needle position to the far right. With the zipper behind the presser foot, line up the right edge of the presser foot as close as you can get to the stitching. I like to hold the seam allowance down with a seam ripper so that it stays out of the way. Backstitch, and then stitch forward to the bottom of the skirt, keeping the seam parallel to the edge.

This is how close the finished stitching should be to the zipper stitching.

Now anchor the zipper tails to the seam allowances by stitching about 1" length. This should not show on the right side of the skirt.

Stitched properly, you should not be able to tell where the zipper ends and the regular seam begins.

Now it is time to fit the side seams to your body. Put the skirt front and back wrong sides together and pin the side seams 5/8" from the edge. Keep the pins parallel to the cut edge.
Try it on and check the fit at the side seams. Adjust pins as needed. If you did adjust the pins, make a chalk mark where the new seam will be.

Also check to make sure that the side seams are perpendicular to the floor and not swinging towards the front or back.

The Butterick 5466 pattern did not come with pockets so I have cut out a pant inseam pocket pattern. Cut out four pockets.

To make the pockets the same shape as the skirt side seam, I placed the skirt front pattern on top of the cut pockets.

Then cut out the pattern on the side seam and the waist. No need to pay attention to the darts.

Place skirt front right side up. Pin pockets right side down to the side seams and waist of the skirt. Then pin the other two pockets to the right side of the skirt backs.

Sew1/4" seams on each pocket.

Serge or zigzag the raw edges together.

Press the seam towards the pocket.

Press also on the right side to make sure there are no fabric tucks.

Understitch the edge of the pocket. This will keep the pocket in place.

All pockets have been understitched.

Place skirt front and back right sides together and pin the pockets and sides together. Put a pin horizontal at the top and bottom opening of the pocket.

Stitch from the waist to the top pocket opening and backstitch. Then stitch the side of the pocket up to the bottom pocket opening, pivot, and sew the rest of the side seam.

At the bottom pocket opening, I stitched a few horizontal stitches to help strengthen the pocket.

Because the inseam pockets will be pressed towards the skirt front, the back seam allowance below the pocket will need to be clipped to release it. I clip it on the bias and then apply a fabric glue to prevent raveling.

With skirt right side out, press where the pocket opening is to create a crease on the skirt front. The pocket lining will not show because it is recessed 3/8".

Pin the pocket to the skirt front at the waist and baste together.

If you did not choose to add pockets, pin the skirt front to the skirt back at the sides and sew 5/8". Then do a seam finish.

Press side seams flat and then press open. I am using a silk pressing cloth to prevent a shine.

PREPARING THE SKIRT LINING
It is recommended to use a size 70/10 needle when sewing the lining.

Fold the darts towards the side and pin.

Baste the tucks. Darts are not sewn in the lining. This eliminates bulk and allows for more ease in the lining.

Place skirt front and back right sides together and pin. If alterations were made to the skirt sides, do the same for the lining.

Sew the side seams and then sew a seam finish through both layers together. Press the seams flat and then towards the back.

At CB cut edges, mark a line 1" longer than zipper and 1/4" from the edge.

Trim away the 1/4" only to the bottom of your mark (usually 10"). If using a serger, serge on the marked line, and then continue to serge to the bottom of CB only cutting off loose threads.


Using the zipper presser foot, sew 1/4" from the serged edge, from the top to the bottom zipper stop. To get around the zipper slider, sew part way down, stop with needle down, and raise presser foot. Then close zipper.

Continue sewing and stop at the bottom zipper stop and backstitch.

Now continue the same steps for the opposite center back. This time the lining fabric will be on the top.

Stitch down to the bottom zipper stop, 1/4" from the serged edge.

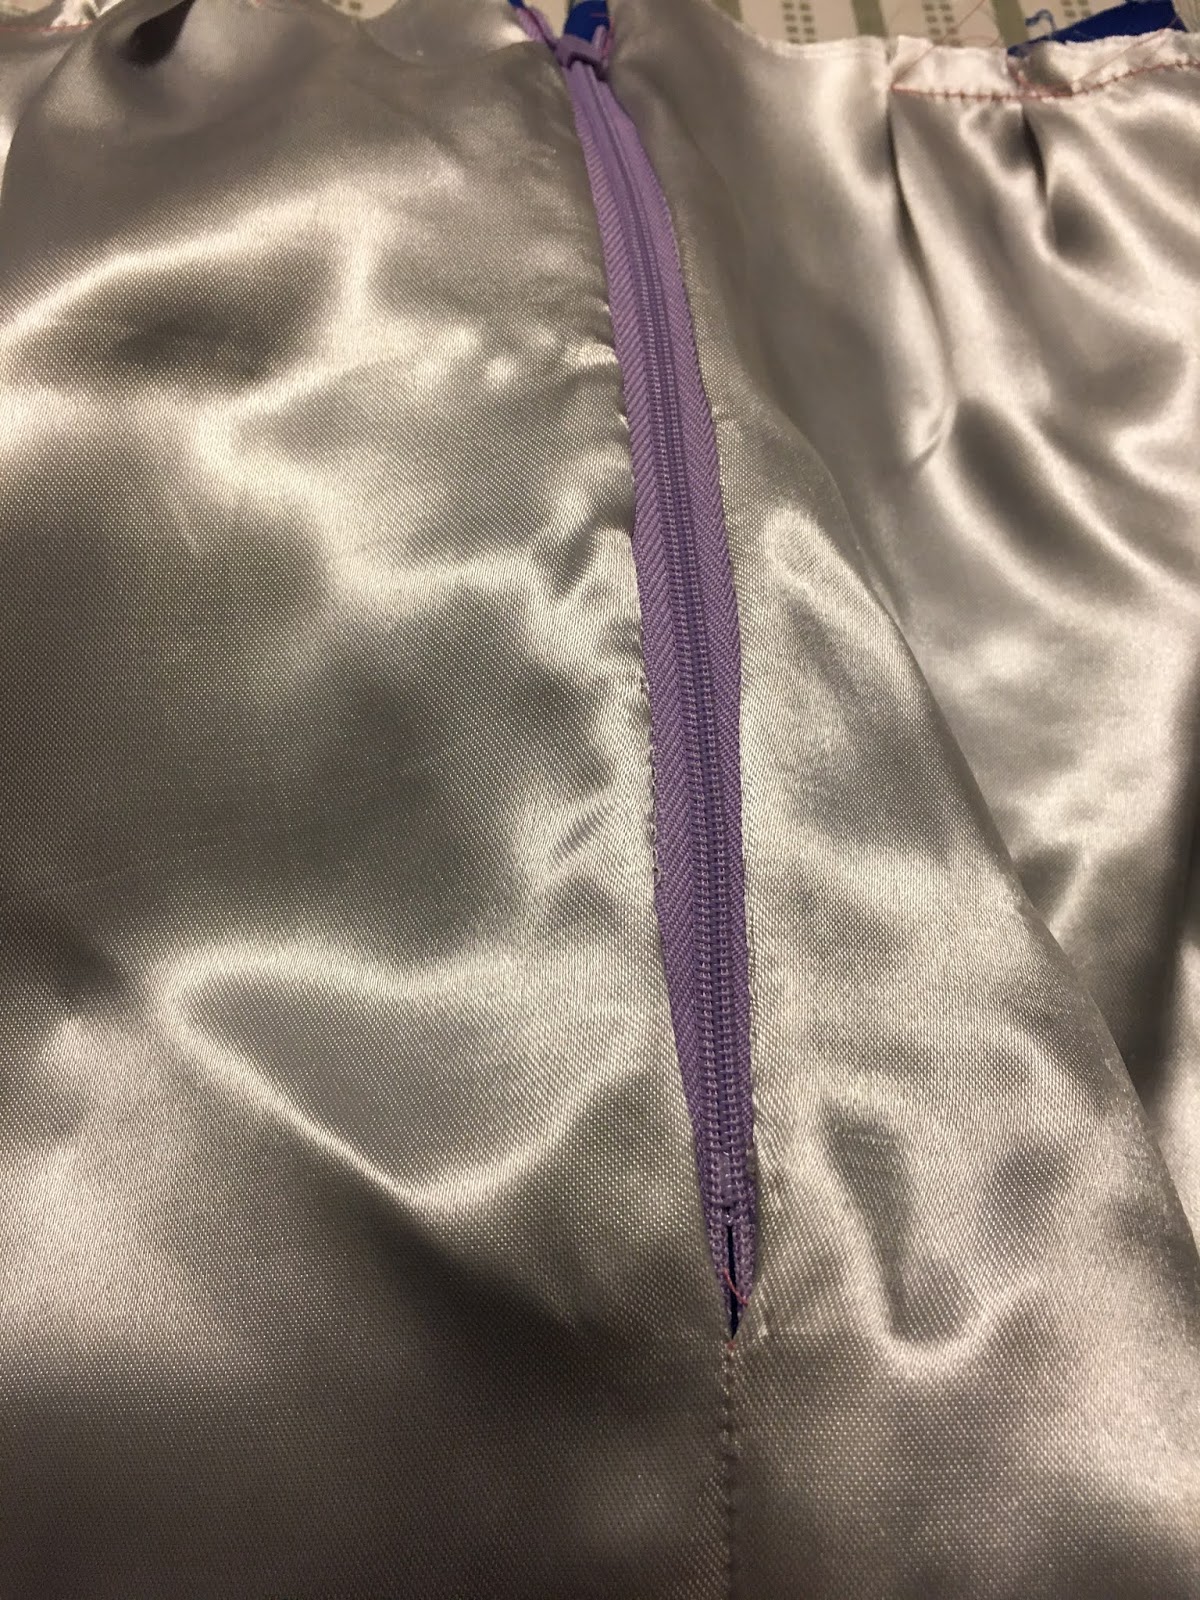
This is what the zipper will look like on the lining side.

Below zipper, pin lining center backs right sides together.

Put a pin perpendicular to mark where the bottom of the zipper tape is.

Sew the center back lining seam at 5/8", backstitching at both ends.

Press lining seam open.

The lining seam will form a "V" shape at the bottom of the zipper. Lining may be pressed to keep it away from the zipper coil.
With fabrics wrong sides together, pin together at the waist.

Check to make sure that lining is offset from the zipper coil.

Baste fabric layers together, 1/2" from edge.

Check to make sure that both sides above the zipper are even. Trim off if necessary.

Pin waistband to skirt, right sides together, matching notches. (Note: if skirt side seams have been altered, the waistband markings may not match.)

The skirt back left side should have 5/8" of the waistband extending beyond the skirt.

The skirt back right side should have at least 1" of the waistband extending beyond the skirt.

Sew 5/8" seam with waistband side up.

Press seam allowances up towards the waistband.

Also press on the right side of the waistband to make sure there are no fabric tucks.

Press up the opposite side of the waistband 5/8".

Trim, leaving only 1/4" on pressed waistband edge.

Trim and grade waistband seam allowance. (Widest to the World.)

At center back, fold waistband in half, right sides together, and pin in place. Draw in stitching line so that it can be stitched accurately, and squared at the corners. Sew on stitched line.

On opposite waistband end (underlap side), fold waistband in half and draw a perpendicular stitching line 1" out from zipper edge. Pin and draw stitching line, squaring the corners. Sew on stitched line.

Trim sides and corners of seams.

Turn waistband corners right sides out and use point turner tool to open up corners.

Pin waistband fold to the stitching line.

Slipstitch waistband opening.

Now let skirt hang for 1-3 days before hemming.

Try the skirt on and have someone measure the hem from the floor. This will ensure that the hem will be parallel to the floor and be even. I determine what the hem allowance will be and then mark the cut edge.

Here is the pinned hem edge.

Mark chalk lines where the pins are.

Connect the chalk marks and check to make sure they connect smoothly.

Trim off excess fabric. (Could be serged and cut at same time.)

Measure and pin up hem allowance. This hem is 1" and lace hem tape will be added.

Press hem fold, taking out pins as you go.

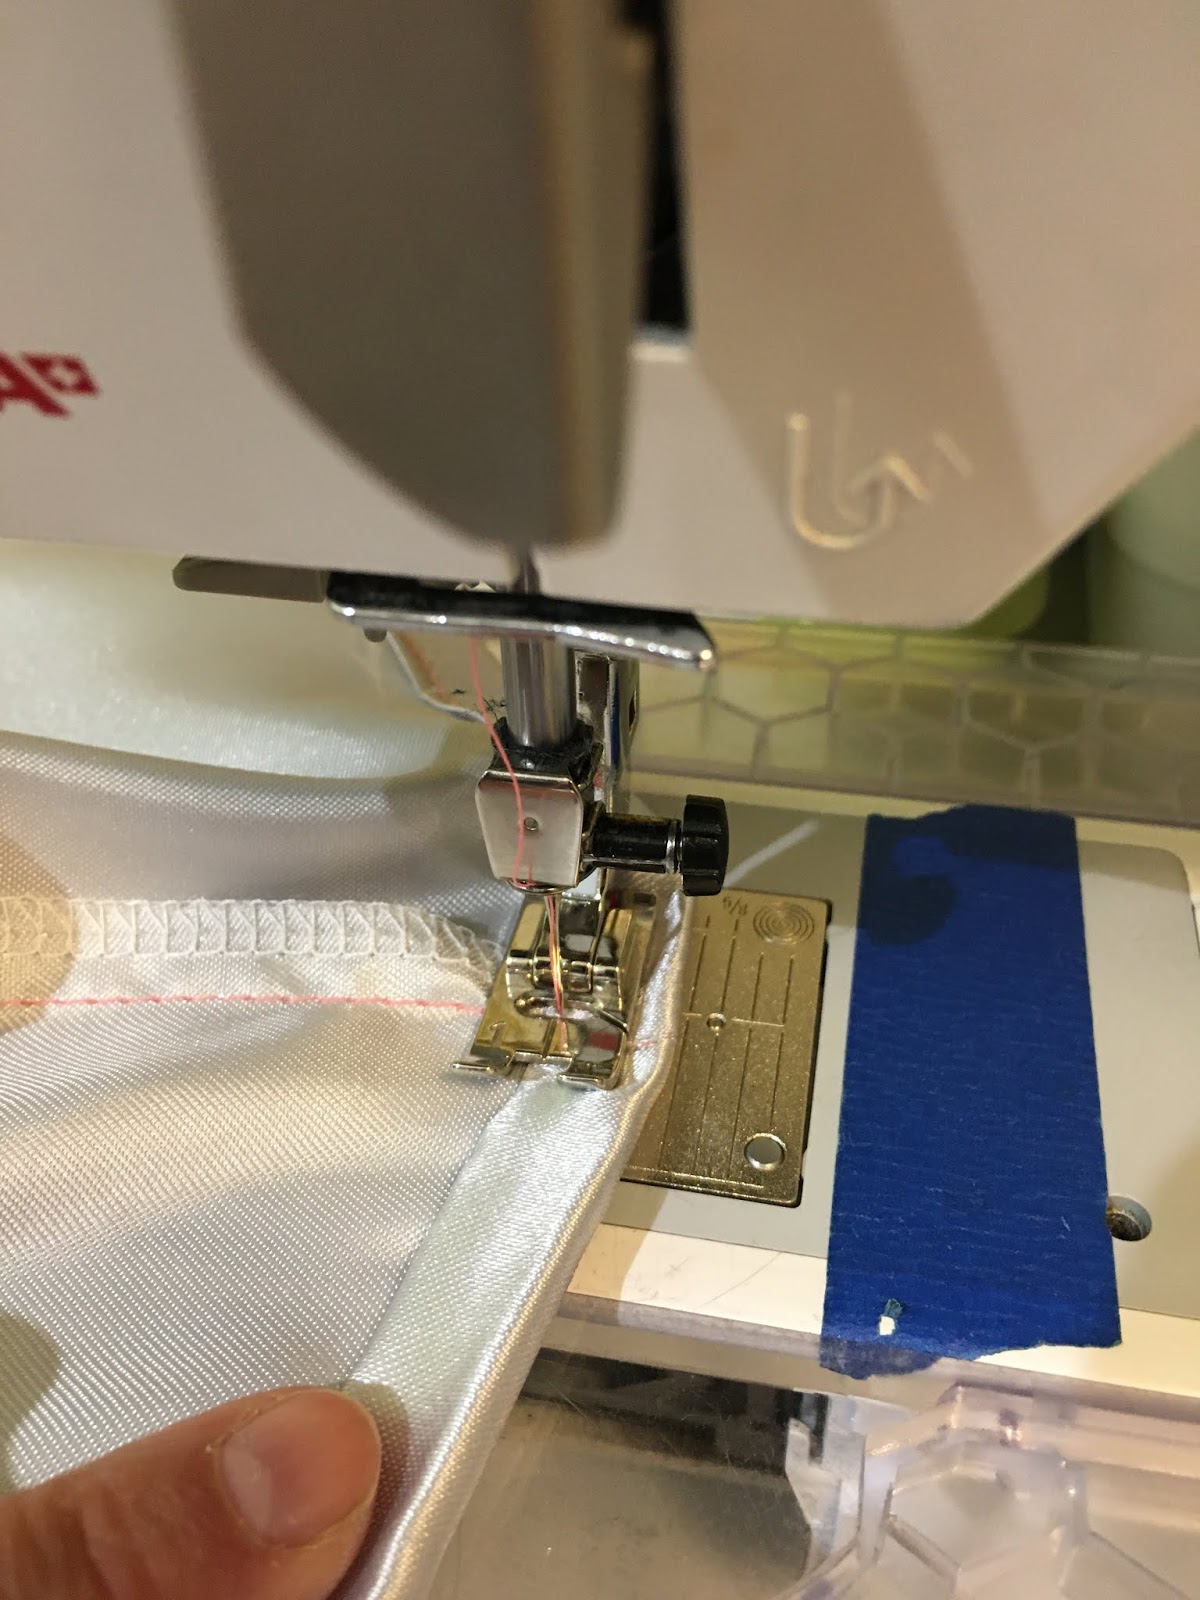
Hem edge is right side up and lace hem tape overlaps the fabric by 1/4". Edgestitch in place.

Overlap lace edges and turn under. Then stitch down.

Fold hem back up on pressed hem fold and pin in place. Sew catch stitch.

Waistband closure could be skirt hook & eye or button. I chose button closure. Place button on waistband overlap. Offset the button by 1/4" from CB edge. Place pin through the button to determine buttonhole placement.

Transfer pin to under the button. This is where the horizontal buttonhole will begin.

Place the thread through the finger of the bobbin case to increase tension in the buttonhole stitch.

Do a test buttonhole to make sure the length is correct for the button size. Then stitch buttonhole on overlap waistband, keeping the buttonhole in the center.

Place the overlap waistband at center back and place pin through end of buttonhole. This will mark button placement for the underlap side.

As you sew the button, add a toothpick to allow for more thread length for the thread shank.

Wrap thread around the thread between the button and the fabric about four times. Then tie knots and hide thread tails. The thread shank will elevate the button to accommodate the fabric thickness of the waistband.

The skirt lining should be 1/2" shorter than the outside skirt. Try the skirt on and mark where the skirt hem is.

Because the lining hem will be a double fold 1/2" (1" total), now mark 1/2" below the pin mark. This will allow for a 1" hem allowance. Cut on this line.

Press hem allowance up 1".

Open up hem and press up half the amount (1/2").

Pin hem and edgestitch inner lip of fold.
Press both hems once again.

