
Cut a piece of craft paper 32" long and 24" wide for drafting the sleeve. Use the measurements from page 94 of "The Art of Fashion Draping" by Connie Amaden-Crawford. My dress form is size 6 so I will use the measurements for size 6.
First, measure the armhole for your draped bodice front and bodice back patterns. Write these measurements down for future reference.

Fold the paper in half lengthwise. You will draft half of the sleeve.

With the fold to the right, start marking the following lines. Draw a perpendicular line from the fold 2" down from the top edge. This will be the cap line. Draw another perpendicular line for the wrist-level line. Measure down from the cap line the desired overarm distance. Size 6 is 22 3/8". Next draw the bicep line. Measure down from the cap line the cap height measurement. Size 6 is 6 1/8".
To determine the elbow measurement, divide the distance from the bicep line to the wristline in half. Draw in the elbow line 1/2" above this halfway point.

Make a cross mark on the bicep line one-half of the bicep circumference. Size 6 is 5 3/4".

Make a cross mark on the elbow line one-half of the elbow circumference. Size 6 is 4 7/8".

Draw the underarm seamline by connecting the bicep crossmark and the elbow crossmark. Continue this line straight up until it crosses the top of the sleeve and down until it crosses the wristline.

Finished underarm seam line.

Now start to draft the curved sleeve cap. Fold the cap area in half from the cap line to the bicep line and make a crease.

Open up that fold and then fold the sleeve in half lengthwise. Place and crease the sleeve foldline to the underarm seamline.

Open up the fold. Now make a guideline for the French curve. Put a crossmark on the bicep line 1" in from the underarm seamline.

Put a crossmark on the lengthwise fold 3/4" above the point at which the folds of the cap height meet.

Draw a faint line to connect these two crossmarks.

To draw the underarm curve of the sleeve cap, use a French curve. Connect A, B and C. All three positions must touch the French curve at the same time.

Here is what the line should look like.

Draw the top portion of the sleeve cap by using the French curve. Position the French curve connecting B, D and E. All three positions must touch the French curve at the same time.

This is what the line should look like.

Make sure to have a 90 degree at the top of the center of the cap.

Measure the cap seamline.

Because we added 1/2" to the width of the draped bodice side front and side back, do the same to the side of the sleeve so that the cap seamline will more closely match the armhole. Blend back to nothing at the wrist line.

Here is the drafted sleeve with the 1/2" increase at the bicep line.

Cut out sleeve on the seam line.

Open up sleeve right side up. Then reshape the front underarm curve. Fold the unmarked underarm area in half.

Measure in 1/4" in the middle of the underarm curve. Blend line to nothing above and below this mark. This side represents the front cap/underarm of the sleeve, which is less width than the back cap.

Trim off this amount at the front cap.

Now prepare to draft the elbow dart. The pivot point will be at the middle fold of the sleeve and the elbow line.

Cut the elbow line and the middle fold line to this pivot point. Lap over the center sleeve line to open up a 1/2" opening at the elbow.

Tape the lapped center to hold in place.

Insert a small piece of paper underneath the slashed opening and tape in place.

Draw the dart 3 1/2" in length and the width of the opening.

Fold the dart closed and trim along underarm seam to create dart end.

Here is the finished elbow dart.

Draw grainline and bicep line.

Add back notches to sleeve to match back armhole.

Add front notches to sleeve to match front armhole.

Measure the front and back armholes and write down amounts.


The sleeve cap line should be 1 - 1 1/2" longer than the two armholes together. The back armhole should measure 1/2" longer than the front armhole. If this is not the case, an adjustment needs to be made to either the armhole shape or the sleeve cap line. When finished, the shoulder position notch should be 1/4" toward the front of the grain.
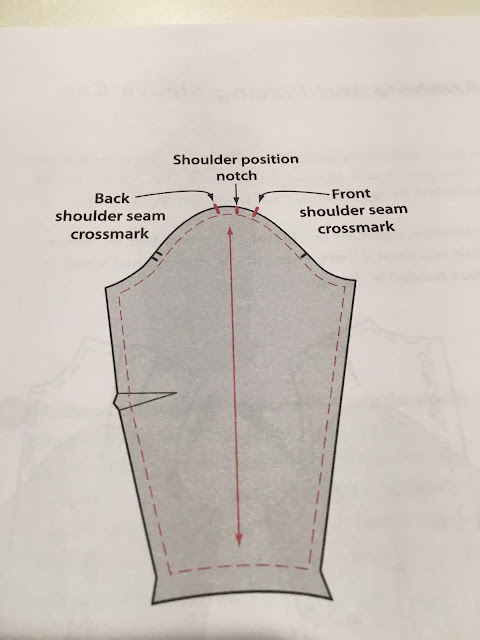
(Image is from "The Art of Fashion Draping" by Connie Amaden-Crawford.)
My sleeve cap line ease is only 1/2" so I plan to increase my ease by 1/2" for dress form size 6, so that the complete ease is 1". You may want to increase your total ease to 1 1/2" for larger dress form sizes.

Following are some options.
Could make armholes larger or smaller. Fit bodice on dress form first before doing this method.

(Image is from "The Art of Fashion Draping" by Connie Amaden-Crawford.)
Draw in 1/2" seam allowances.


Cut out sleeve on cutting lines.

Measure the cap seam line (do not include any seam allowances). Write this amount down.
Create an oval that will become the armhole pad. Fold paper in half twice. Measure up 3" on fold.

Measure over 2 1/2" on other fold.

Square lines up and out from each mark.

Draw a diagonal line from corner to corner.

Measure down 1" from upper corner and mark.

Using the French curve, draw a smooth curved line touching this mark.

Cut out on curved line to make oval shape.

Here is the oval shape. Now it is a little tricky to explain how to get it to match your cap seamline. My cap seamline is 17" I could use that as my final length, or I could substract 1" for the amount of ease in my cap. I chose to leave it at 17" since my fabric is stiff and will not ease as well.


Here is my stitching line. I need to make sure that I have 1/2" seam allowance out from this stitching line. Adjust your oval as needed so that you will have 1/2" seam allowance.


Fold pattern paper in half to prepare the shoulder support pattern piece.

Measure up 5" and mark on fold.

Measure over 4" on fold and mark.

Connect A to C and B to C.

Mark center of A to C and square up 5/8".

Draw a smooth curved line from A to C.


Measure up 5/8" from B and mark.

Draw a curved line from B to C.


Cut on new curved lines. This will include a 1/2" seam allowance. (Pattern says "cut 4" but it should say "cut 2".)

Fold a piece of pattern paper in fourths. Draw the wrist circle, including the 1/2" seam allowance.

Make sure to have a 90 degree at the top of the center of the cap.

Measure the cap seamline.

Because we added 1/2" to the width of the draped bodice side front and side back, do the same to the side of the sleeve so that the cap seamline will more closely match the armhole. Blend back to nothing at the wrist line.

Here is the drafted sleeve with the 1/2" increase at the bicep line.

Cut out sleeve on the seam line.

Open up sleeve right side up. Then reshape the front underarm curve. Fold the unmarked underarm area in half.

Measure in 1/4" in the middle of the underarm curve. Blend line to nothing above and below this mark. This side represents the front cap/underarm of the sleeve, which is less width than the back cap.

Trim off this amount at the front cap.

Now prepare to draft the elbow dart. The pivot point will be at the middle fold of the sleeve and the elbow line.

Cut the elbow line and the middle fold line to this pivot point. Lap over the center sleeve line to open up a 1/2" opening at the elbow.

Tape the lapped center to hold in place.

Insert a small piece of paper underneath the slashed opening and tape in place.

Draw the dart 3 1/2" in length and the width of the opening.

Fold the dart closed and trim along underarm seam to create dart end.

Here is the finished elbow dart.

Draw grainline and bicep line.

Add back notches to sleeve to match back armhole.

Add front notches to sleeve to match front armhole.

Measure the front and back armholes and write down amounts.


Walk the sleeve cap line to the armhole. Mark where the shoulder hits the cap line.

Do the same for front and back.


The sleeve cap line should be 1 - 1 1/2" longer than the two armholes together. The back armhole should measure 1/2" longer than the front armhole. If this is not the case, an adjustment needs to be made to either the armhole shape or the sleeve cap line. When finished, the shoulder position notch should be 1/4" toward the front of the grain.

(Image is from "The Art of Fashion Draping" by Connie Amaden-Crawford.)
My sleeve cap line ease is only 1/2" so I plan to increase my ease by 1/2" for dress form size 6, so that the complete ease is 1". You may want to increase your total ease to 1 1/2" for larger dress form sizes.

Following are some options.
Could make armholes larger or smaller. Fit bodice on dress form first before doing this method.

Could add length to cap line by horizontal slash and spread.

Could decrease length to cap line by folding on horizontal line.

Could slash and pivot on grainline and bicep line and open up the cap.

Could slash and spread to increase cap line.

Could slash and overlap to decrease cap line.

If you need to make adjustments, first trace off the sleeve sloper to keep the original intact.

I chose the following option to add 1/2" of cap ease. With the new sleeve sloper traced, slash at the top of the grainline and the bicep line, hinging at the underarm. Pinning sloper to cardboard, spread apart the desired amount and pin in place.

Slide paper scraps under the slashes and tape down.

Redraw the grainline and the bicep line. Place sleeve sloper on single layer of muslin, leaving fabric on all four sides for seam allowances.

Draw 1/2" seam allowances around all four sides of sloper. Trace elbow dart and grainline.

Cut out sleeve pattern on cutting lines. Sew an ease stitch between cap notches at 1/2" and 1/4" from cut edge. Fold dart down and pin closed.

Fold on seam line and pin underarm seam together. I inserted a plastic ruler inside the sleeve to make the pinning easier.


INSTRUCTIONS TO MAKE PADDED ARM
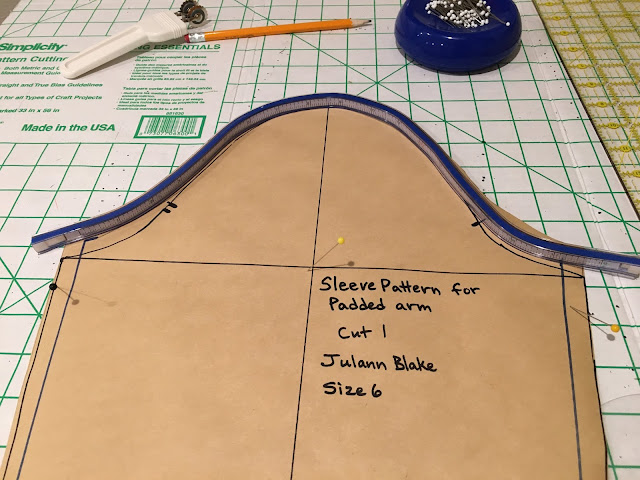
Trace the adjusted sleeve sloper onto craft paper, including elbow dart and notches.

The new traced sleeve will have the underarm seam and cap seam line adjusted.

Mark 3/8" in from the underarms. Draw new underarm seams.

Blue lines show the new underarm seams 3/8" in from original.

Raise the biceps 1/2".

Lower the cap 1/4" at the top of the cap.

Blend the new cap seam line using the French curve.


Measure the wrist line from new underarm seams. Adjust wrist measurement to whole numbers. For example, 6 1/4" should be recorded as 6".


If the wrist measurement has been adjusted, move in the underarm seam to make the difference like the ruler indicates.
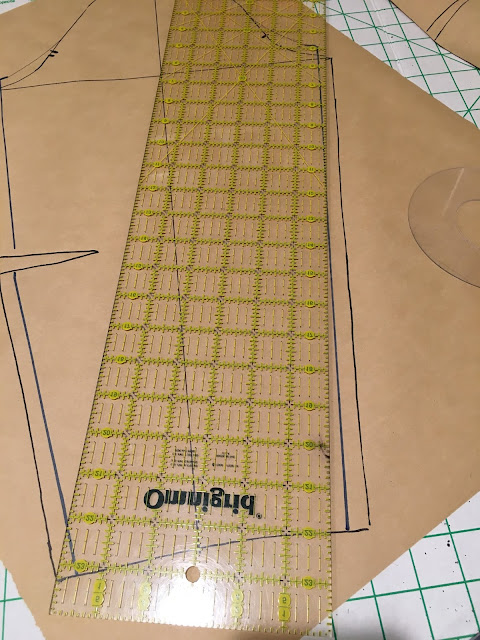
If your personal arm measurements are smaller, you may adjust this pattern to fit your custom arm.

Could decrease length to cap line by folding on horizontal line.

Could slash and pivot on grainline and bicep line and open up the cap.

Could slash and spread to increase cap line.

Could slash and overlap to decrease cap line.


Slide paper scraps under the slashes and tape down.

Redraw the grainline and the bicep line. Place sleeve sloper on single layer of muslin, leaving fabric on all four sides for seam allowances.

Draw 1/2" seam allowances around all four sides of sloper. Trace elbow dart and grainline.

Cut out sleeve pattern on cutting lines. Sew an ease stitch between cap notches at 1/2" and 1/4" from cut edge. Fold dart down and pin closed.

Fold on seam line and pin underarm seam together. I inserted a plastic ruler inside the sleeve to make the pinning easier.

Pin muslin sleeve on draped bodice front and back on dress form. Check for ease at front and back armhole. Check to see if sleeve hangs nicely without drag lines. Adjust if necessary. Mark where shoulder seam meets cap. This should be 1/4" in front of the grainline (center of the sleeve).


INSTRUCTIONS TO MAKE PADDED ARM
Trace the adjusted sleeve sloper onto craft paper, including elbow dart and notches.

The new traced sleeve will have the underarm seam and cap seam line adjusted.

Mark 3/8" in from the underarms. Draw new underarm seams.

Blue lines show the new underarm seams 3/8" in from original.

Raise the biceps 1/2".

Lower the cap 1/4" at the top of the cap.

Blend the new cap seam line using the French curve.


Measure the wrist line from new underarm seams. Adjust wrist measurement to whole numbers. For example, 6 1/4" should be recorded as 6".


If the wrist measurement has been adjusted, move in the underarm seam to make the difference like the ruler indicates.

Draw in 1/2" seam allowances.


Cut out sleeve on cutting lines.

Measure the cap seam line (do not include any seam allowances). Write this amount down.

Create an oval that will become the armhole pad. Fold paper in half twice. Measure up 3" on fold.

Measure over 2 1/2" on other fold.

Square lines up and out from each mark.

Draw a diagonal line from corner to corner.

Measure down 1" from upper corner and mark.

Using the French curve, draw a smooth curved line touching this mark.

Cut out on curved line to make oval shape.

Here is the oval shape. Now it is a little tricky to explain how to get it to match your cap seamline. My cap seamline is 17" I could use that as my final length, or I could substract 1" for the amount of ease in my cap. I chose to leave it at 17" since my fabric is stiff and will not ease as well.

I divided 17 by 4 which is 4.25. My oval is folded in fourths so this is what I need to measure for my stitching line.

Here is my stitching line. I need to make sure that I have 1/2" seam allowance out from this stitching line. Adjust your oval as needed so that you will have 1/2" seam allowance.


Measure up 5" and mark on fold.

Measure over 4" on fold and mark.

Connect A to C and B to C.

Mark center of A to C and square up 5/8".

Draw a smooth curved line from A to C.


Measure up 5/8" from B and mark.

Draw a curved line from B to C.


Cut on new curved lines. This will include a 1/2" seam allowance. (Pattern says "cut 4" but it should say "cut 2".)

Fold a piece of pattern paper in fourths. Draw the wrist circle, including the 1/2" seam allowance.
My wrist line measurement is 6" . To calculate radius, divide your wrist length (circumference) by 6.28. The number is .95 so I rounded it up. I used 1" as my radius. Mark it on both folds of the paper. Draw a quarter circle. (NOTE: you may choose to do an oval sketch instead of a circle. Just use the same measurements.)

Add 1/2" above this curve for the seam allowance.

Finished wrist circle, including 1/2" seam allowance.

I chose a cotton twill fabric for my padded arm. I will cut out the shoulder support twice. Only cut one of everything else. Keep fabric right side up. This will make a right padded arm.

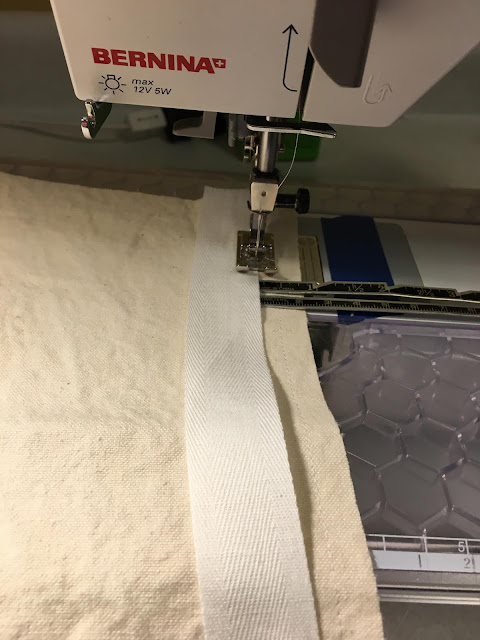
Optional: Add 1/2" - 1" wide twill tape to the bottom of the wrist. This helps strengthen the wrist for pinning. Topstitch on both sides of the twill tape, placing the tape 5/8" up from the bottom cut edge. Also staystitch 1/2" from bottom edge.

Sew ease stitch 5/8" and 3/8" from edge of cap between notches.

Put both shoulder support pieces together and sew 1/2" on the two convex curves.

Trim seam allowances.

Turn right side out and press edges. Staystitch bottom raw edge 1/2" from edge. Place pin at center.

Sew underarm seam, leaving a 5-6" opening in the middle of the sleeve for turning. Also leave beginning and ending of seam unstitched 1/2". Press seam open.


Baste shoulder support to armhole pad.

Pin right side of shoulder support and armhole pad to right side of cap seamline circle.

Sew 1/2" seam allowance around cap. May want to stitch again for strength.

Trim to 1/4".

Pin wrist circle into fourths. Do the same for wrist opening in sleeve. Clip wrist edge.

Pin wrist circle to sleeve wrist opening.

Sew 1/2" seam allowance and then trim to 1/4".

Turn sleeve right side out.

Add stuffing into sleeve opening. Use wooden spoon to help get stuffing into both ends. Stuff firmly but do not overstuff or sleeve will be too stiff.

Slipstitch opening closed.


Pin padded arm to right side of dress form.


Add 1/2" above this curve for the seam allowance.

Finished wrist circle, including 1/2" seam allowance.


Optional: Add 1/2" - 1" wide twill tape to the bottom of the wrist. This helps strengthen the wrist for pinning. Topstitch on both sides of the twill tape, placing the tape 5/8" up from the bottom cut edge. Also staystitch 1/2" from bottom edge.

Sew elbow dart and press down.

Sew ease stitch 5/8" and 3/8" from edge of cap between notches.

Put both shoulder support pieces together and sew 1/2" on the two convex curves.

Trim seam allowances.

Turn right side out and press edges. Staystitch bottom raw edge 1/2" from edge. Place pin at center.

Sew underarm seam, leaving a 5-6" opening in the middle of the sleeve for turning. Also leave beginning and ending of seam unstitched 1/2". Press seam open.

Find center at top of armhole pad piece.

Pin shoulder support to right side of armhole pad, matching centers. Clip top of shoulder support to lay smooth.

Baste shoulder support to armhole pad.

Pin right side of shoulder support and armhole pad to right side of cap seamline circle.

Sew 1/2" seam allowance around cap. May want to stitch again for strength.

Trim to 1/4".

Pin wrist circle into fourths. Do the same for wrist opening in sleeve. Clip wrist edge.

Pin wrist circle to sleeve wrist opening.

Sew 1/2" seam allowance and then trim to 1/4".

Turn sleeve right side out.

Add stuffing into sleeve opening. Use wooden spoon to help get stuffing into both ends. Stuff firmly but do not overstuff or sleeve will be too stiff.

Slipstitch opening closed.


Pin padded arm to right side of dress form.


***SEW***CREATE***LIVE***
* * *
*
Tags: padded arm, draped arm, drafting a sleeve, fitted sleeve, padded arm for draping, make your own padded arm, drafting a fitted sleeve, custom sleeve pattern