This A-line skirt has front and back darts, center back lapped zipper, and waistband.

Layout and Cutting:
After preshrinking your fabric (unless it is dry clean only), lay the fabric out on table folded in half, wrong sides together, with selvages matching along the long edge.

Place the skirt front pattern on the fold. Place the skirt back pattern off from the selvage edge. Measure from selvage edge to assure that the pattern is on the grain line.


Pin every two inches and add a pin diagonally at the corners.

Optional: If you want to conserve fabric, you may offset your fabric fold just enough for the width of the skirt patterns and leave the remainder for the waistband and extra fabric.

Cut out waistband parallel to selvage edge on a single layer of fabric.

Cut notches away from the pattern like this below:

While patterns are still on the fabric, transfer dart markings to the wrong side of the fabric. You may use chalk paper and a tracing wheel. With fabric wrong sides together, place double-chalk paper in between the fabric layers. Trace dart legs with tracing wheel. Lift tracing wheel as you go so the pattern paper will not shift. Notice the sequence in the next three photos:


Now make a horizontal line in the center of the circle. It will make a "+" mark to show the center of the circle.


On the waistband, be sure to cut out your notches,

and mark the "square" symbols on the wrong side of the fabric.

Because the waist is slightly curved, it is best to staystitch the waist area. Remember to stitch directionally, from the skirt side to the center, 1/2" from the cut edge. Do this to both the skirt front and the skirt backs.


Darts:
Pin darts, matching up dart legs.

Stitch from the wide end of the dart to the point.
At 1/2" from dart point, shorten stitch length to 1.5 and finish stitching to point, stitching last two stitches exactly on fold.

Do not backstitch at dart point. Instead, leave thread tails and tie a knot. Cut threads tails, leaving 1/2" on.

First press dart stitches flat to meld the stitches.

Use a pressing ham to press darts to the center.

Press darts to center front and center back.

Press dart on the fabric right side to make sure there are no tucks in the dart seam.

TIP: The zipper length for the skirt is 7" If your waist to hip ratio is larger than 10", you may want to choose a 9" zipper to allow for a larger opening to put the skirt on.

This picture is for the 7" zipper. The zipper marking on the pattern is 8"for a 7" zipper. If you choose a 9" zipper, measure down 10" from the waist cut edge and make a pin mark.

Pin skirt backs right sides together.

Stitch skirt back seam from the skirt bottom to the zipper marking, backstitching at both ends of seam.


Press seam flat, then press seam open.

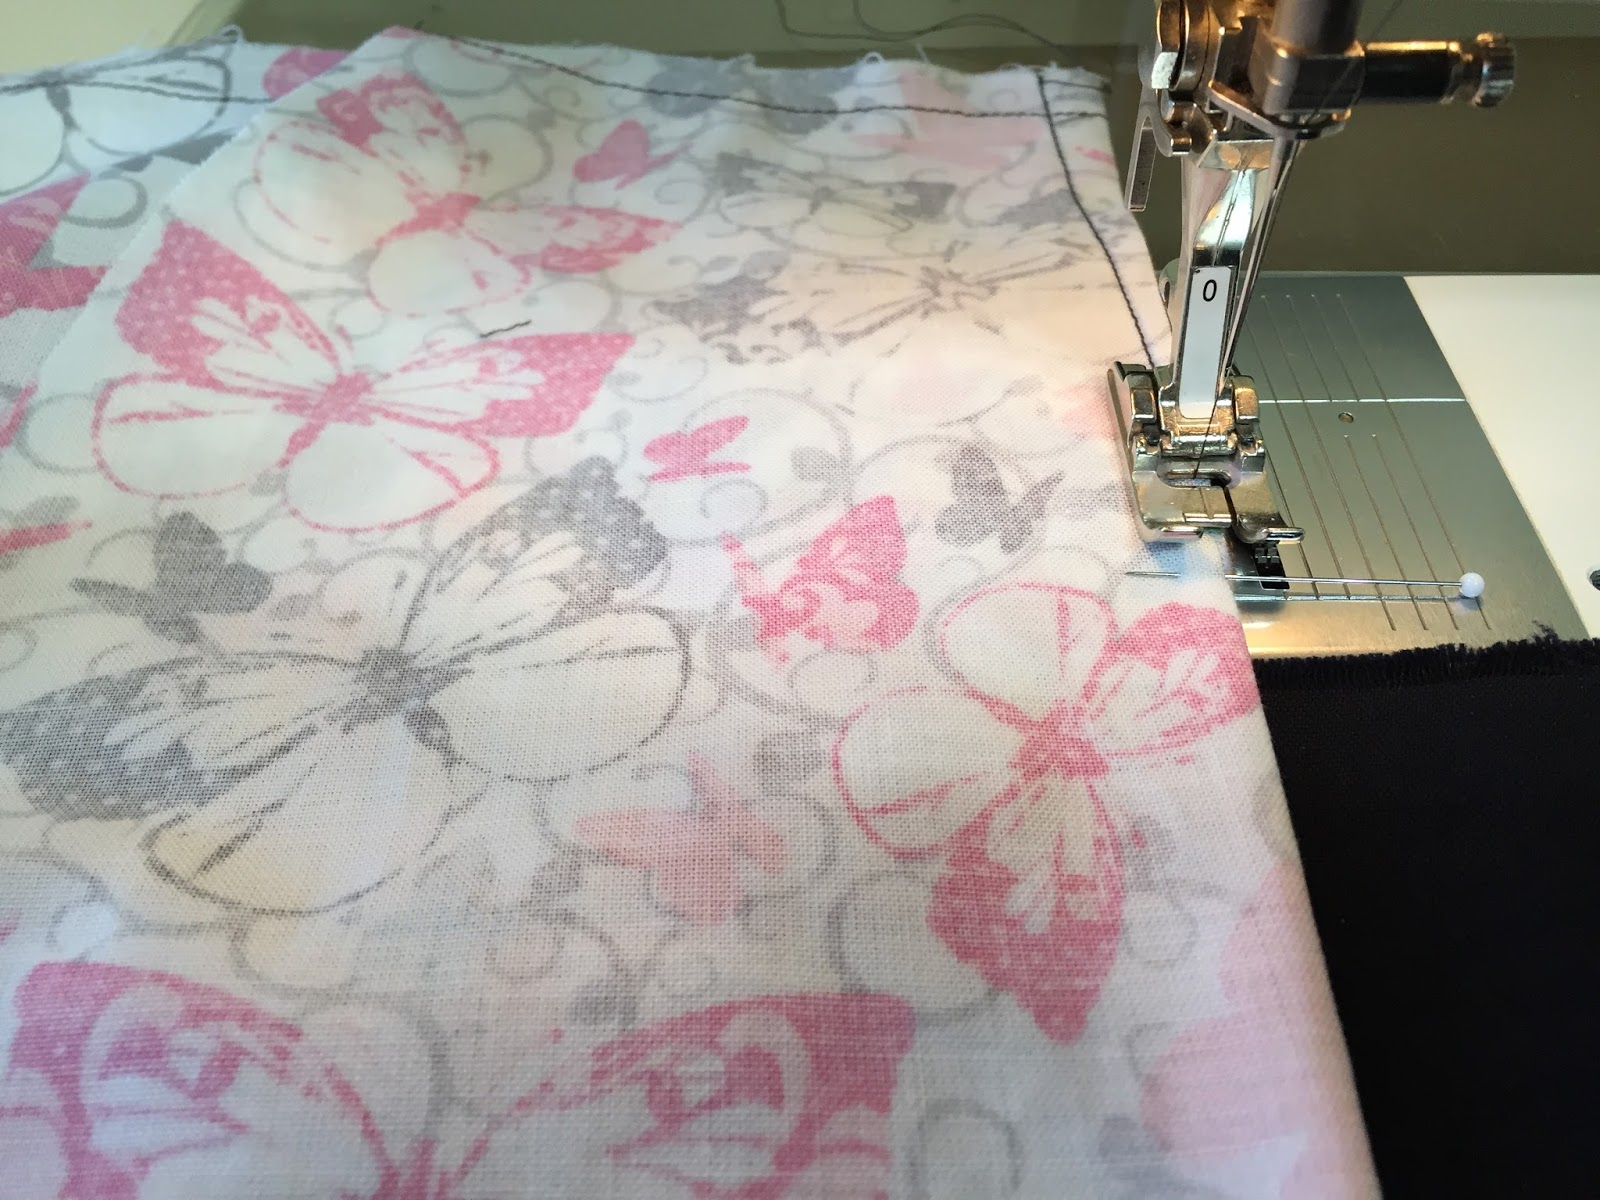
Decide on a seam finish that will be appropriate for your fabric. The fabric for this skirt is a crisp cotton so a turned and stitched seam finish is appropriate. Roll under seam allowance raw edge 1/8" and edgestitch. Stop when you get to zipper marking.

The zipper opening cannot have a turned and stitched seam finish as it will make the seam allowance width too narrow. A 5/8" seam allowance is necessary for the lapped zipper application.

In the zipper area, zigzag the raw edges.

Turn skirt fabric right side down. Turn your right edge back 5/8" and press. This forms the zipper overlap.

Turn your left edge back 1/2" and press. Continue pressing this 1/2" amount 2" below the zipper opening. This forms the zipper underlap.

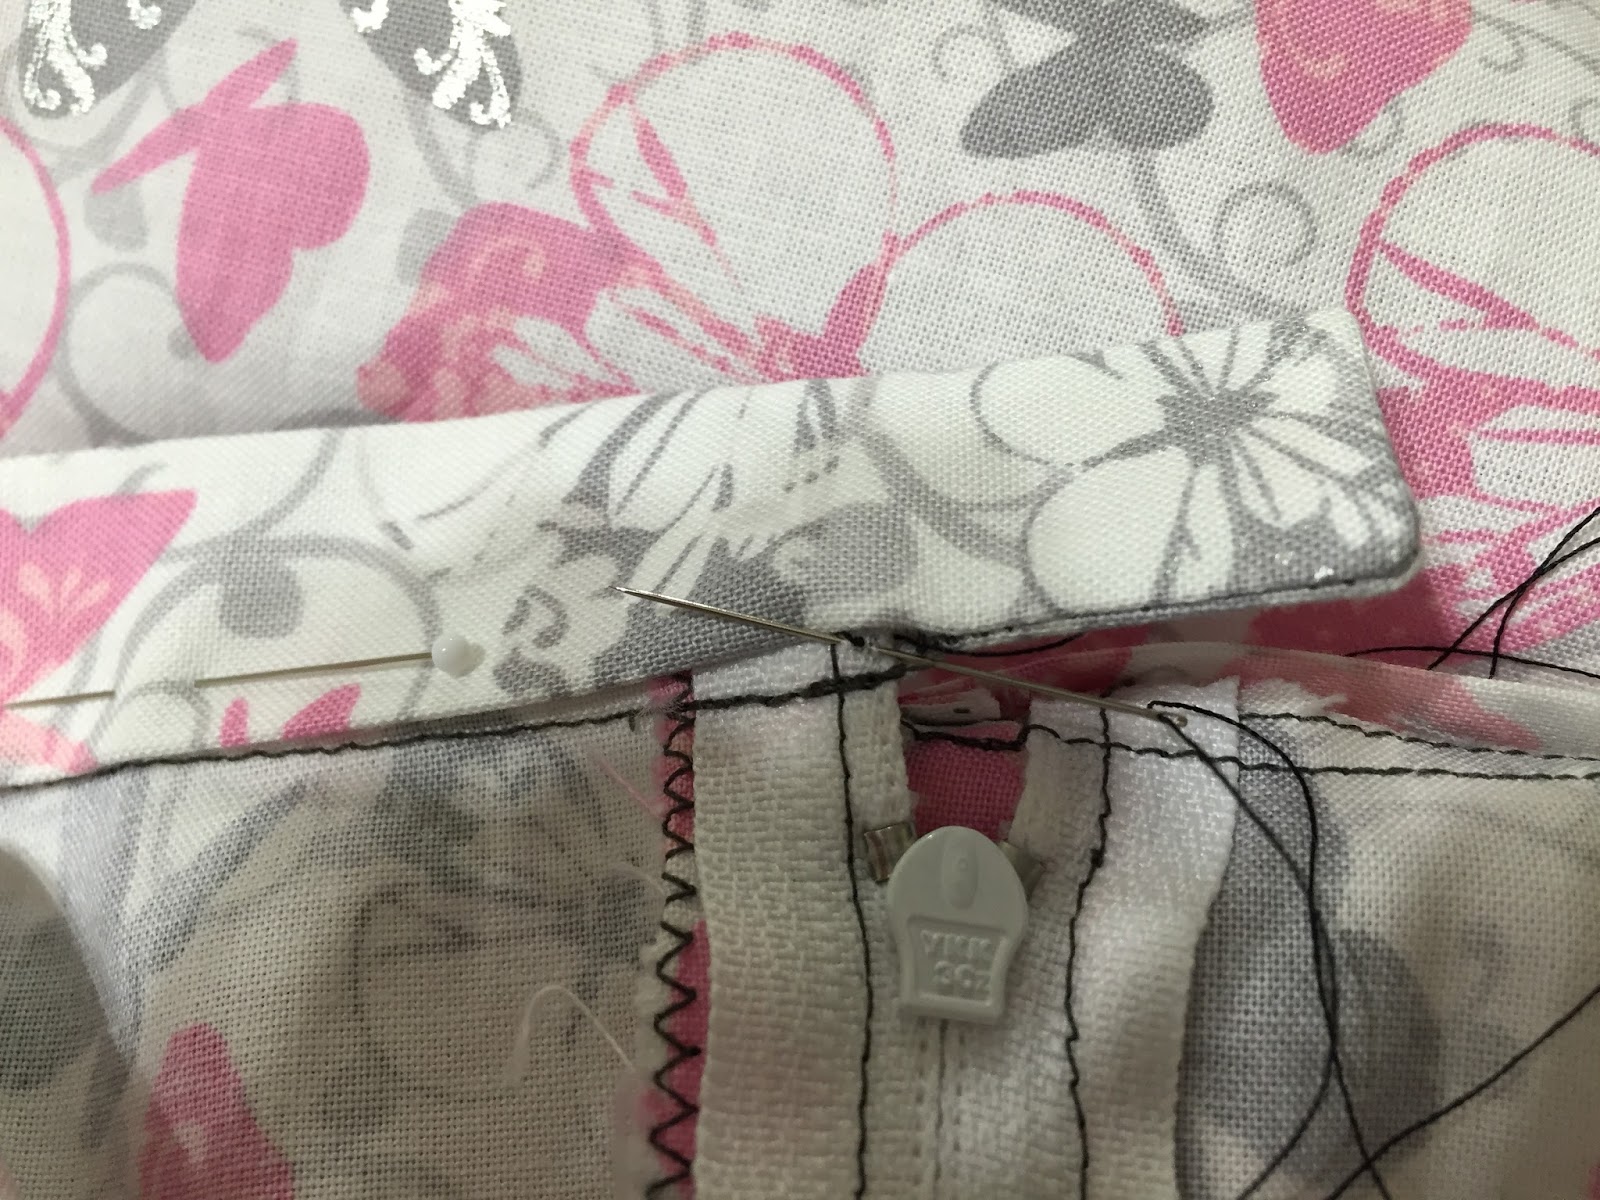
Now turn your fabric right side up. Below is a picture of where the open zipper area ends and the center back seam begins. Notice that there is a 1/8" underlap from your pressing. This is very important.


Pin fabric to zipper tape, with pins facing towards the skirt top. Notice that the zipper bottom stop is placed right where the center back seam ends.

Select the zipper presser foot. It should have open sides so that the needle can stitch on either the right side or the left side of the presser foot.

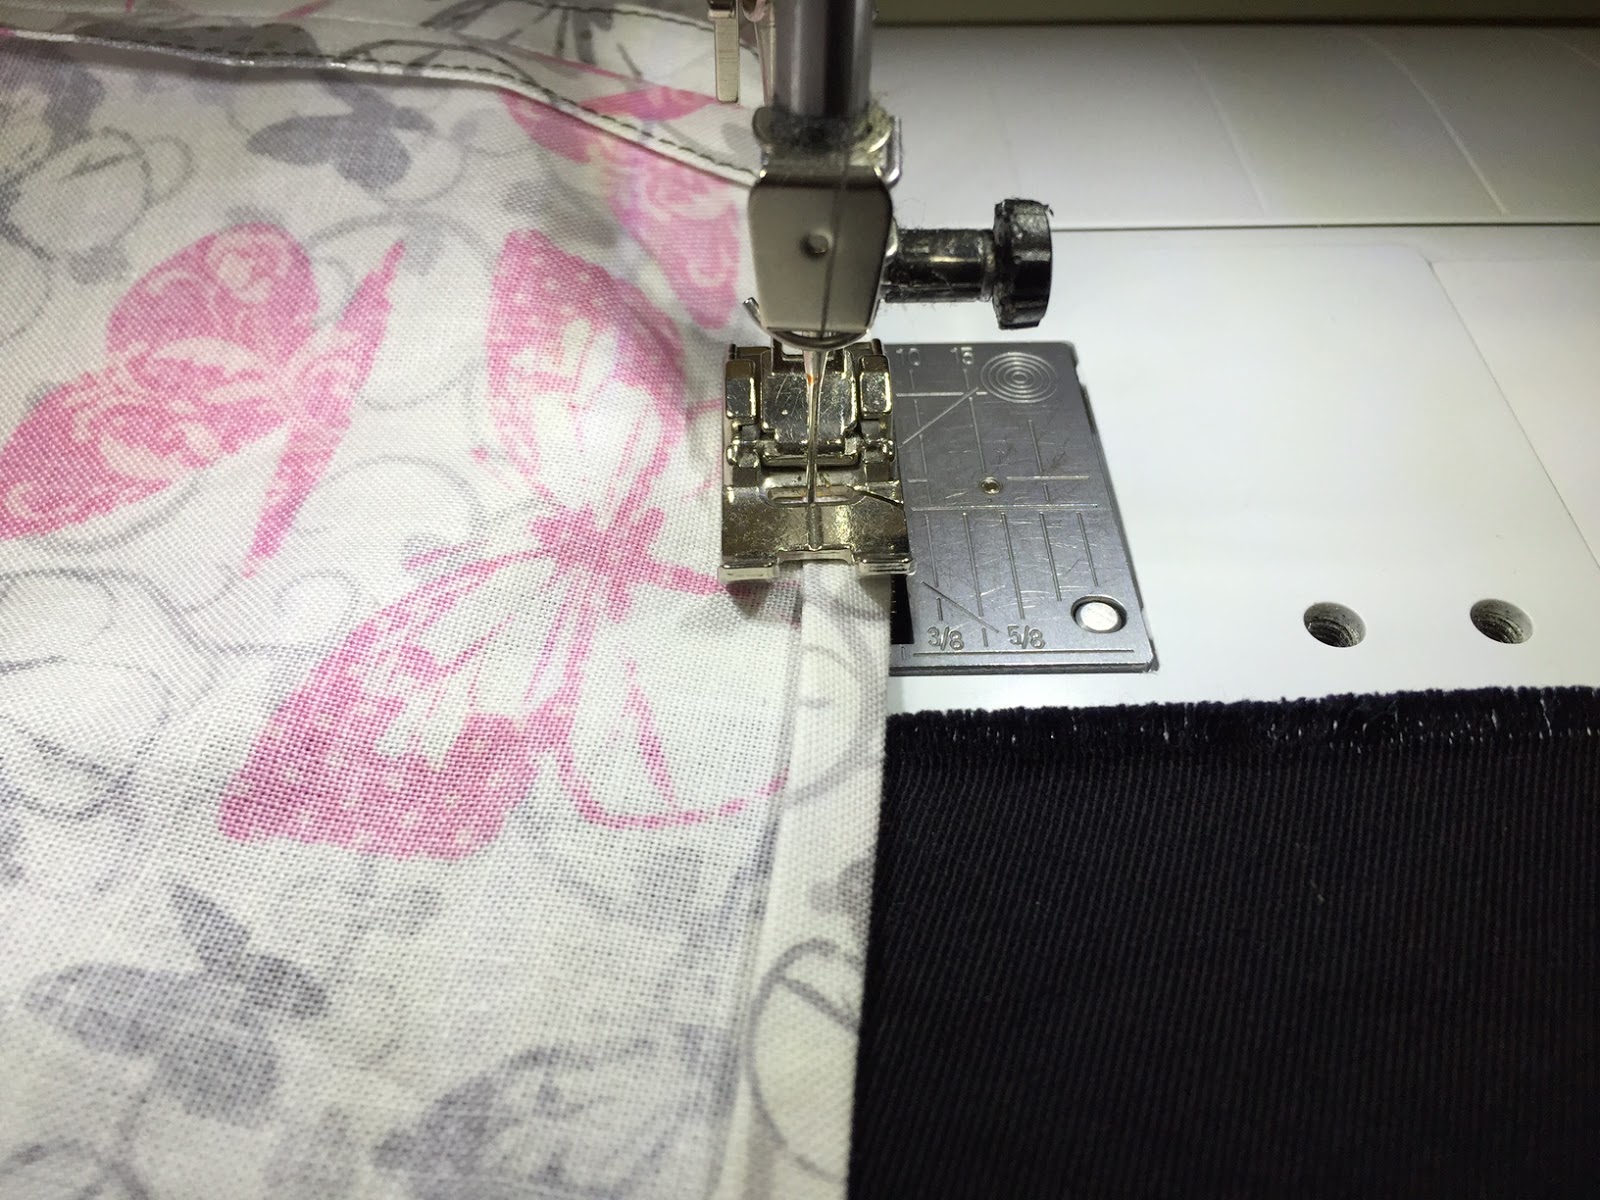
In zipper application, it is important to always stitch in the same direction. There are many ways to sew a lapped zipper. This application is the "no basting method". You will stitch from the top to the bottom. With needle to the far left of the presser foot, place left edge of zipper presser foot along the folded edge of the fabric. Edgestitch along the fold of the fabric from the top of the zipper to the bottom, keeping zipper and fabric even. begin stitching with the zipper slider 1/3 of the way down. Just before reaching the zipper slider, with the needle in the down position, lift the presser foot and zip the slider back to the top.

When you get to the zipper bottom stop, backstitch.

Now prepare the overlap by making a 1/2" chalk line on the right side of the fabric for your stitching guide. Or you may want to use 1/2" clear tape as your stitching guide.

Here is what the chalk marking looks like.


Now pin skirt overlap to the skirt underlap, overlapping 1/8". It is very important to be accurate, so that the fabric will conceal the zipper coil.


Also check the back side to double check that the pins have caught both fabric layers and the zipper tape on the stitching line.

Before stitching, unzip the zipper to 1/3 down. Move needle position to right side of zipper foot. Begin stitching on the chalk line.

Once you get to the zipper slider, with needle down, raise presser foot and close zipper.


Raise presser foot and pivot.

Lower presser foot and continue stitching to seam line. be sure that you are stitching below the zipper bottom stop. Do not backstitch. Leave 5" thread tails.
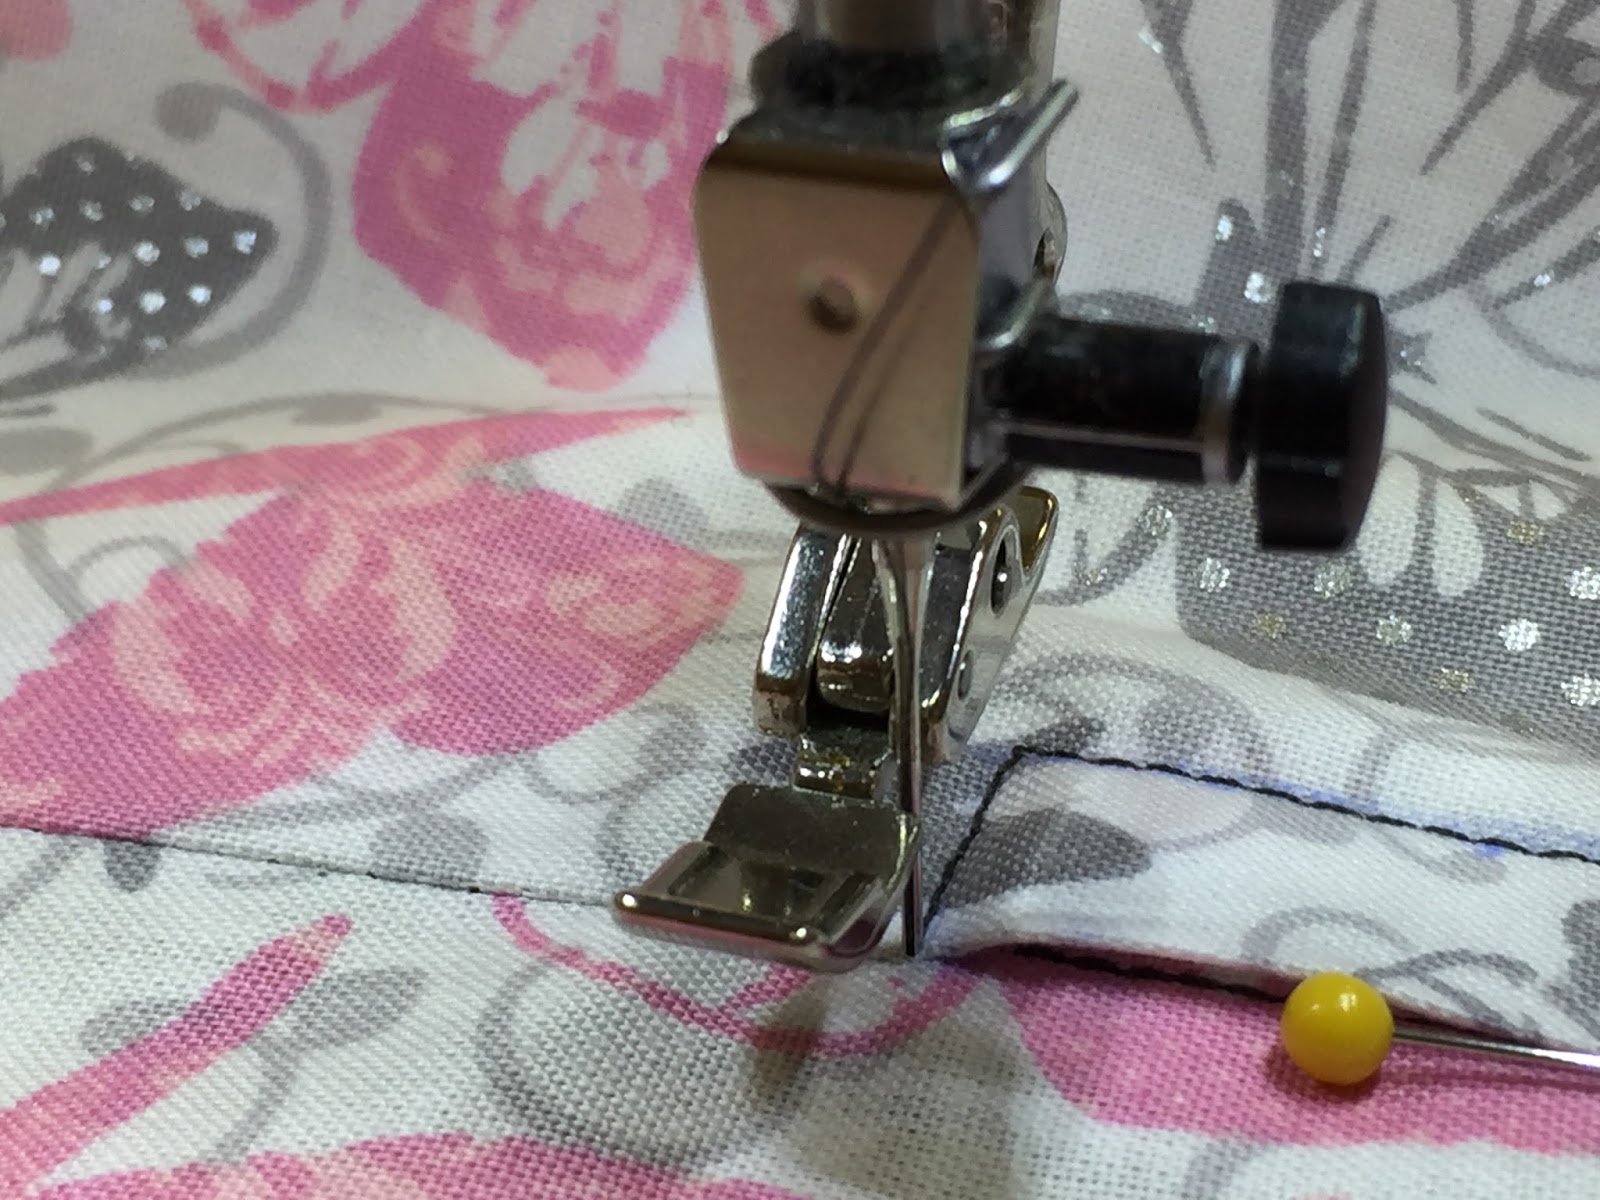
Pull on bobbin thread to pull needle thread to the zipper side. Tie a knot in the threads.
Put a pin in the knot to help guide the knot next to the zipper tape.


Trim thread tails to 1/2".


Now it is time to custom fit the skirt sides to your body. Do this by putting skirt front to skirt back with wrong sides together. Pin the side seams 5/8" from the cut edge, with the pins parallel to the edge and with the pins pointed down.

Try on the skirt to see how it fits. If you need to make adjustments, do so by moving the pins. This works best with another person helping. Your seam allowance may end up changing depending on your body shape.

Take skirt off and make a chalk or pencil mark on the fabric wrong side where the pins are. Take the pins out and draw a chalk line connecting the pin marks. This will be your seam allowance marking.
Pin skirt front to skirt back, with right sides together. (Note: if you increased the seam allowance at the waist more than 5/8", it may change the fit when you add the waistband.)

Sew side seams, stitching directionally. This means stitching from the widest to the narrowest part of the skirt, beginning at the skirt hem end and ending at the skirt waist end, backstitching at both ends.

Press seams flat to meld the stitches.

Press side seams open. Then do a seam finish.

Cut out waistband in fusible interfacing. Trim off 1/2" on all four sides.


Press from the center out.

Press waistband in half, lengthwise, with wrong sides together.

On waistband un-notched side, press under raw edges 5/8"


On waistband un-notched side, press under raw edges 5/8"

Sew an ease stitch at skirt sides, from back dart to front dart. Do this to both skirt sides. Leave thread tails for pulling.

Check center back raw edges above zipper, to make sure both edges match up. This will help prevent an uneven zipper edge. Trim if necessary.

Start pinning waistband to skirt, matching up single and double notches and other markings.

The square marking matches the side seams.

Pull on ease stitch to pull in extra skirt fullness to match waistband.


Sew waistband to skirt at 5/8". Keep ease area smooth to prevent large puckers.
To help with skirt ease, sew with waistband facing you, with skirt next to the machine feed dogs. Be sure to keep skirt fabric smooth to prevent puckering.

When finished stitching, make sure that the horizontal seam matches at center back.


Then press seam up towards waistband. You may do this over a pressing ham.


and overlap areas of the waistband.

Now grade seam allowance.

Underlap end:

On underlap side, fold waistband right sides together, matching 5/8" fold line with waistband seam line. Pin in place.

Begin stitching at the waistband end with 5/8" seam allowance, pivoting at corner. Then continue stitching to waistband stitching.

Be sure to backstitch at both ends.


Turn underlap right side out and push out corners with point pressing tool.


Overlap end:

On overlap side, fold waistband right sides together, matching 5/8" fold line with waistband seam line. Pin in place.

Stitch 5/8" seam, beginning at edge of zipper fold.

Here is stitching when finished.

Here is a picture of the finished and trimmed overlap and underlap.

On overlap, trim and grade seam allowance. Turn overlap right side out and use point turner tool to make even corner.


Press waistband once again. Be careful not to press over pins.

Check to make sure that the waistband horizontal seams match at center back.

With waistband pinned in place, slipstitch waistband to waist seam allowance.
Here is the slipstitching when finished. Stitching should not show on right side of skirt.

Hook & Eye Closure:
Sew a skirt hook to the waistband overlap. Stitching should go through all fabric layers, but do not let stitches show on right side of waistband. Then line up the overlap to the underlap and mark where the eye placement should be.


Determine what hem allowance you prefer. Then mark the cutting line. For example, if you want a 1" hem allowance, mark 1" below your desired skirt length. Mark the cutting line every 2".


Take the skirt off and chalk mark your pin markings. Then remove the pins.

Connect all the chalk markings, making the line smooth.

Cut along the chalk line to cut off the excess fabric.

There are three options for your hem: double fold hem, machine blind hem, and the hand slipstitch hem.

Machine Blind Hem:
Finish off the raw edges. This can be done on the serger or the sewing machine. Then stitch an ease stitch 1/4" from the edge.

This picture shows the zigzag finish and the ease stitch.

Measure your hem allowance.


Between each pin, pull on the ease stitches on the fabric wrong side to pull up excess fabric. Then press to pull in extra fabric ease.


Fold back the hem to reveal a 1/4" lip on the fabric edge. Use the machine blind hem presser foot and the blind hem stitch on your sewing machine. Make sure that the straight stitching is on the fabric lip and the zigzag to the left barely stitches through the fabric fold. You want the prick stitch to be very small.

This shows the finished hem from the fabric wrong side. Notice that the zigzag stitch barely stitched through the fabric, about 1/16".

This picture shows the skirt hem on the fabric right side. Notice the small prick stitches showing through. With matching thread, this becomes an invisible hem. Be sure to keep your stitches an even distance from the hem fold as shown below.

Double Fold Hem:
Pres up the hem 1/2" and press.

Open up that fold and then press again 1/4" from the edge.

Then fold the hem back up to the double fold. Stitch close to the edge of the inside fold.
You may use the machine blind hem presser foot for this topstitching. The guide bar helps to make the stitching accurate.

Here is the accurate stitching from the inside fold.

Here is the picture showing the right side of the hem. Notice that the topstitching is parallel to the hem bottom edge.

Hand Blindstitch Hem:
Press up hem allowance and finish off raw edges or fold under the raw edges. Place pins perpendicular on the hem, matching seam lines.

Now flip hem allowance back to expose 1/4" on the inside of the fold.


This is what your prick stitches should look like on the outside of the skirt hem. The stitching will not sure on the right side when using matching thread.

This is the prick stitch on the inside of the skirt hem.

* * * SEW * * * CREATE * * * LIVE * * *
* * *
*