Tricot Blessing Dress with Long Bodice


2 1/8 yards sheer tricot
3/4 yard regular tricot
Sheer Tricot Cutting Instructions:
First fold tricot with stretch on 108" side. May be folded in 8 layers.
Cut 3 strips (5 1/2" wide) for ruffles
Cut 4 strips (3" wide) for ruffles
Underskirt (cut 1 on the fold)
Sleeves (cut 2 or 4, depending on how opaque you want the sleeves)
Bodice back (cut 2--right and left)
Bodice front (cut 1)
Overskirt (cut 1 on the fold) Check with instructor before cutting this pattern piece.
Regular Tricot Cutting Instructions:
Slip (cut 1 on the fold)
Bodice back (cut 4--right and left)
Bodice front (cut 2)
Sewing Instructions for Bodice:
Lay the regular tricot Bodice Front and the two regular tricot Bodice Backs on the counter with the right sides up. Make sure you have a right and a left Bodice Back. Keep fabrics clean from lint and hair.

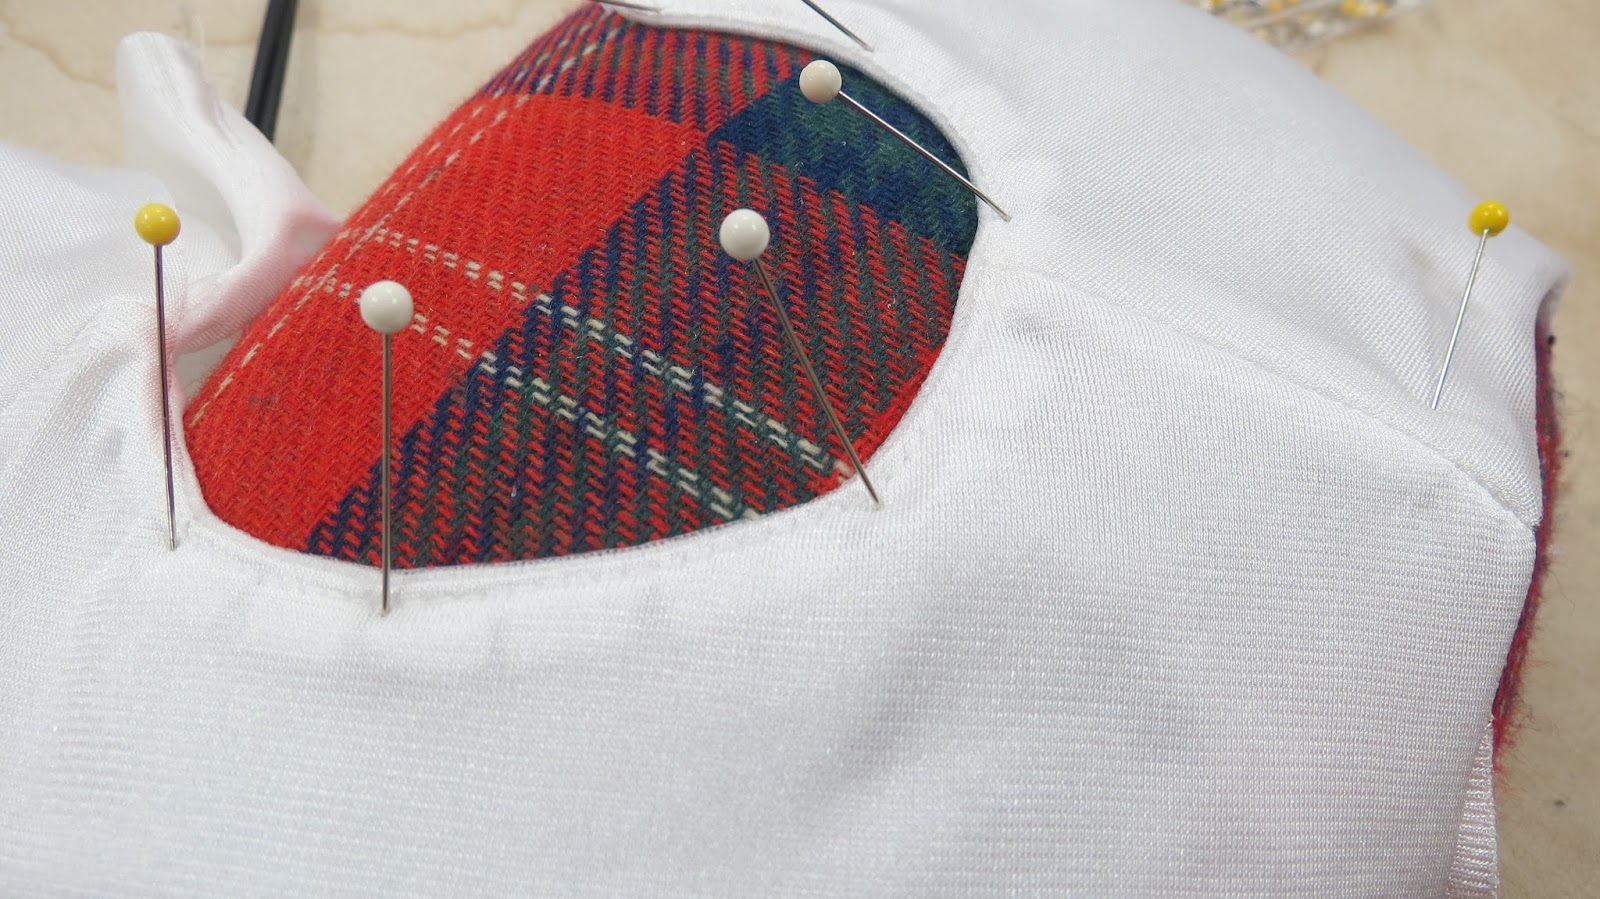
Place the sheer tricot Bodice Front (right side up) on top of the regular tricot Bodice Front (right side up). Place the sheer tricot Bodice backs (right side up) on top of the regular tricot Bodice Backs (right side up). Make sure you have a right and a left Bodice Back. Pin tricot layers together, matching raw edges.

Suggested needle size is 70. Suggested needle tip is ballpoint. Stitch length is 3. Stitch close to the cut edge of both Bodice Backs and the Bodice Front all the way around each piece. Change needle position to the far right so that the seam allowance will be 1/8".

Showing sheer tricot basted to regular tricot.

Lay the Bodice Front on the counter with the right side up. Place the Bodice Backs on top, with right sides down. Pin the shoulder seams.

Stitch shoulder seams using 1/4" seam allowance, backstitching at both ends.

Repeat this step with the unlined Bodice Front and unlined Bodice Backs.

Press the seam allowances open using a warm iron and a damp press cloth. I like using a seam roll pressing tool.

I also like using a silk organza pressing cloth to protect the nylon fabric.


OPTIONAL: If adding lace to the neckline, it would be added at this point.
Lay the lined Bodice on the counter with the right side up. Lay the unlined Bodice on top with the right side down. Pin the neckline seam, matching up the shoulder seams. Stitch around the neckline area using 1/4" seam allowance.

Clip the neckline curve every 1/2", being careful not to cut through your final stitches.

Understitch neckline, stitching on the lining side close to the seam line, with seam allowances to the lining side.

Press the seam to lining side, using a warm iron and a damp press cloth.

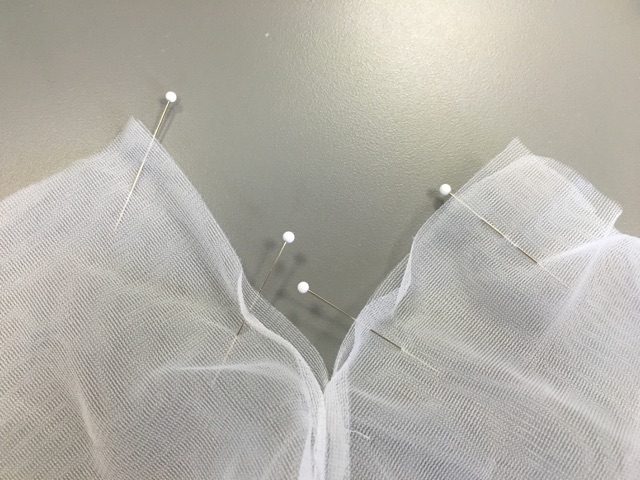
Now turn Bodice right sides out, positioning the neckline over a pressing tool, pinning at the seam line to hold it in place. Notice that the pins are at an angle, so they can be removed quickly as the iron touches the fabric.
Add a pressing cloth and press neckline, removing pins as you press so they will not leave an imprint.

Use a wooden clapper pressing tool for a crisp crease.

Grade (trim seam allowances unevenly, with "widest to the world") the seam allowance.
(NO PICTURE YET.)

FOR LONG BODICE ONLY: Separate lining from outer bodice and pin side seams together.

Sew 1/4" seam allowance.

Press seams open.

FOR SHORT BODICE ONLY: Baste the edges of the armhole together close to the cut edge of the fabric.
SLEEVES--Search for your Sleeve Style
Sheer Puffed Sleeves:

Lay two Sleeves, single layer, on the counter with the right side up. Pin approximately 17 inches of lace on top of each Sleeve. The right side of the lace should face down. The top edge of the lace should be about 1/8" - 1/4" from the bottom edge of the Sleeve. Stitch without stretching the fabric.

Lay the two Sleeves (which you just finished) on the counter with the right side up. Lay the other two Sleeves on top with the right side down. Pin the bottom edge of the Sleeves. Sew along the first stitching line, just slightly farther from cut edge.

Turn the Sleeves right side out. Press using a damp press cloth and a warm iron.

Optional: The next two pictures are for sewing beading lace onto the sleeve. Sew beading lace 3/4" from the bottom edge of the sleeve seam. Sew the bottom of the beading first. Then sew the top edge of the beading.

Fold the sleeve in half, right sides together. Sew underarm sleeve seam, 1/4" from edge. Weave 1/8" or 1/4" satin ribbon through the holes when the sleeve is finished and pull to desired sleeve circumference for baby's arm. Tie in a bow.

Sleeve with Elastic: Sew the end of the 1/8" elastic 3/4" from the bottom edge of the sleeve with a straight stitch. Set the sewing machine to zig zag: stitch width--5.5, stitch length--3. Zig zag over the elastic, not catching the elastic with the stitches.

Set machine to normal stitching. Pull the elastic to the desired length. Make sure that the final sleeve circumference will be comfortable for the baby. Sew the other end of the elastic with a straight stitch to hold it in place.

Fold the sleeve in half, right sides together. Stitch the underarm seam using 1/4" seam allowance.

Baste (4 stitch length) from the underarm seam around the armhole to the underarm seam. Leave thread tails and do not backstitch. Gather the sleeve to fit the armhole.
Lined Classic Short Sleeve:

Cut 4 sleeves in regular tricot or woven fabric. Cut 2 sleeves out of sheer tricot or sheer fabric.

Place one sheer tricot sleeve on top of one regular tricot sleeve and pin together.

Baste two layers together by moving needle to the far right and stitch with a long stitch length. Sew with presser foot next to raw edges of fabric.

Basting stitching is now complete. There may be a slight puckering but it can be smoothed out with the iron or snipping a few stitches.

Optional: If you would like lace at the bottom of the sleeve, pin the right side of the lace to the right side of the sleeve, offsetting the bottom of the lace from the sleeve bottom by 1/8".

On the corners, move the lace down so that it ends at the 1/4" seamline.

Baste the lace to the lined sleeve front, right sides together.

Now prepare to sew the lining to the outer sleeve.

Pin the sleeve lining to the basted sleeve.

Sew the sleeves together with a 1/4" seam allowance.

Understitch on the sleeve lining, with the seam allowances moved to the lining side. Stitch close to the sleeve seam.

Turn sleeve right side up and press on the lining side. Get a nice, crisp edge. You may want to add the clapper pressing tool.

This is what it will look like after pressed. Notice that the lace is curved to nothing by the time it meets the 1/4" seam line.

Now open up sleeve and fold sleeve over, right side to right side, matching sleeve side seam. Pin, matching seam where the lace is inserted.

Sew seam 1/4" from edge.

Carefully press seam open.

Turn sleeve right side out, with lining on the inside. You may have some of the lining be longer than the outer sleeve at the top of the cap. This is because of the understitching and the "turn of cloth." You may trim it down to match the outer sleeve. Pin at the sleeve side seam and the center of the sleeve cap.

Add a gathering stitch (4 stitch length) to the center half of the sleeve cap seamline. Pull on this thread to pull up the sleeve cap to shape it. Don't pull too much. Now the sleeve is ready to be sewn in the armscye.
Baby Doll Sleeve with Band:

Place regular tricot sleeve and band right side up. Place sheer tricot sleeve and band right side up on top of regular tricot. Pin together and then baste layers together, 1/8" from outside edge.
Then sew a gather stitch (4 stitch length) along bottom edge. Do not backstitch, and leave thread tails for pulling.)

Divide bottom of sleeve and band into four equal parts and pin for markings.

Match up sides and other pin markings. Pin right side of band to right side bottom of sleeve.

Pull on the gathering threads on both ends of the sleeve. Adjust gathers to fit the band. Both sleeve and band should now be the same length. Keep gathers evenly spaced.

Sew just to the left of the gathering stitch through all fabric layers.

Press seam allowance down towards the band.

Fold sleeve in half and pin. Sew sleeve side seam including the band.

Press seam open.

Turn band to wrong side of sleeve, turning under the raw edge 1/4". Pin to sleeve, matching stitching line. Handstitch band to sleeve, using the slipstitch. Watch video link Slipstitch Video
Sew gathering stitch (4 stitch length) all around sleeve top, 1/4" from raw edge. (This will be next to the basting stitch.) Do not backstitch and leave thread tails at both ends.

Find center of sleeve cap and mark with a pin.

Now sleeve is ready to be sewn into completed bodice.
Lined Petal Sleeve:

NOTE: This McCalls petal sleeve pattern has 5/8" seam allowances.
Cut out 4 sleeve backs and 4 sleeve fronts out of regular tricot or woven fabric. Cut 2 sleeve backs and 2 sleeve fronts out of sheer tricot or sheer woven fabric.

Place one sheer sleeve (back and front) on top of regular sleeve fabric. Pin.

Baste (4 stitch length) all around sleeve pieces, sewing sheer to regular layer. Sew both sleeve backs and both sleeve fronts.

Place one sleeve front with one sleeve back, right sides up, with sleeve side seams next to each other.

Now place sleeve front to sleeve back, matching at sleeve side seam and pin in place.

Stitch 5/8" seam allowance, backstitching at both ends. Also sew sleeve lining pieces together the same way, sleeve front to sleeve back.

Press seam open.

Trim seam allowance to 1/4".

Optional: If adding lace at the sleeve bottom, do it now. Place right side of lace to right side of sheer sleeve fabric. Offset bottom of lace 1/2" from sleeve cut edge. Pin in place.

Baste lace to sleeve.

Place outer sleeve with sleeve lining.

Pin sleeve lining to outer sleeve.

Stitch at 5/8" seam allowance.

Trim seam allowance to 1/4".

Understitch on sleeve lining, with seam allowances flipped to lining side. Stitch close to seam line.

Turn sleeve right side out and press on lining side. May use clapper pressing tool to get crisp edge.

Identify circle pattern markings with pins.

Fold sleeve in circle, matching circles. Instructions say to place sleeve back over sleeve front.

You may place sleeve front over sleeve back if you like that look better.
Baste sleeve layers together, 1/2" from edge.

Sew ease stitch (4 stitch length) at the 5/8" line, at the center of the cap. Pull the threads at both ends to add shape to the sleeve cap.

Sewing Instructions for Ruffles:
Trim the selvages from the ends of all the strips.
With right sides together, sew all the 5 1/2" strips together into one LONG strip.
With right sies together, sew all the 3" strips together into one LONG strip.
Attach the Bernina #16 gathering foot to the machine. Adjust the stitch length to achieve the desired fullness. (The larger the number, the greater the fullness.)

Position the fabric so the cut edge lines up with the right side of the gathering foot. The right side of the fabric should be on top. Pull on the thread tail if necessary to start the fabric through the machine. The fabric will gather automatically as you stitch.
Gather the LONG 5 1/2" strip and gather the LONG 3" strip. Remove the gathering foot.

Sewing Instructions for Under Skirt:
Pin the 5 1/2" gathered ruffle to the bottom edge of the Under Skirt, with right sides together. The cut edges should line up and the gathering stitch should be about 1/4" from the cut edge of the Under Skirt.

Stitch on the same stitching line which was used to gather the ruffle, only slightly closer to the bottom edge of the ruffle.

OPTIONAL: If attaching lace at the bottom of the ruffle, sew it now. Lay the Under Skirt on the counter with the right side up. Place lace on top of the bottom edge of the ruffle of the Under Skirt with the right side up. Stitch close to the top edge of the lace.
OPTIONAL: If you want to sew lace over the ruffle seam line, sew it now. Position lace on top of the Under Skirt at the seam line (of the ruffle), with the right side of the Under Skirt up and the right side of the lace up. The bottom edge of the lace should slightly cover the stitching line. Stitch the top edge of the lace first. Do a second row of stitching at the bottom edge of the lace. It will take approximately 67" of lace. Beading lace (lace with holes through which ribbon can be woven) or regular lace can be used.
If beading lace is used, weave 1/8" or 1/4" ribbon through the holes.
Fold the Under Skirt in half, with right sides together and pin the center back seam. Align the bottom edges of lace and also the top edges of the ruffle.

Stitch from the bottom edge of the Under Skirt to 3" from top edge. Stop stitching at that point and backstitch.

Sewing Instructions for Over Skirt:
Decide if you want the ruffle to come up in the center front or in the center back OR that the ruffle doesn't come up in the center front or in the center back. Check with the instructor before going to the next step.
Pin the 3" ruffle to the bottom edge of the Over Skirt, with right sides together. The cut edges should line up and the gathering stitch should be about 1/4" from the cut edge of the Over Skirt.

Stitch on the same stitching line which was used to gather the ruffle, only slightly closer to the bottom edge of the ruffle.

OPTIONAL: If you want lace on the bottom of the ruffle, sew it on now.
Lay the Over Skirt on the counter with the right side up. Place lace on top of the bottom edge of the ruffle of the Over Skirt with the right side up. Stitch close to the top edge of the lace.
OPTIONAL: If you want to sew lace over the ruffle seam line, sew it now. Position lace on top of the Over Skirt at the seam line (of the ruffle), with the right side of the Over Skirt up and the right side of the lace up. The bottom edge of the lace should slightly cover the stitching line. Stitch the top edge of the lace first. Do a second row of stitching at the bottom edge of the lace. It will take approximately 67" of lace. Beading lace (lace with holes through which ribbon can be woven) or regular lace can be used.
If beading lace is used, weave 1/8" or 1/4" ribbon through the holes.
Fold the Over Skirt in half, with right sides together and pin the center back seam. Align the bottom edges of lace and also the top edges of the ruffle.
Stitch from the bottom edge of the Over Skirt to 3" from top edge. Stop stitching at that point and backstitch.
Sewing Instructions for Slip:
Lay the Slip on the counter with the right side up. Place lace on top of the bottom edge of the Slip with the right side of the lace up. Stitch close to the top edge of the lace. It will take approximately 67 " of lace.
Fold the Slip in half, with right sides together and pin the center back seam. Align the bottom edges of lace and also the top edges of the ruffle. Stitch from the bottom edge of the Slip to 3" from top edge. Stop stitching at that point and backstitch.

Fold the back opening to the wrong side twice the seam width as the seam allowance (fold 1/8" twice).

Stitch the 3" placket on both sides. Keeping the needle in the down position will help keep the fabric from shifting while sewing.

Sewing Instructions for Skirts:
Pin the Over Skirt to the outside of the Under Skirt, with the right side of the Over Skirt and the right side of the Under Skirt out. The ruffles will be at the bottom, with the 3" shorter ruffle on the top.

Pin the back openings together.
Fold the back openings to the wrong side twice the seam width as the seam allowance (fold 1/8" twice). If you have trouble with this, you may want to baste the two layers together first.

Stitch the 3" placket on both sides. Keeping the needle in the down position will help keep the fabric from shifting while sewing.

Now pin the Slip to the inside of the Under Skirt layer.

Baste all three layers together, stitching very close to the top edge of the skirts by moving the needle position to the far right. Do not stitch the sleeve openings.

Now it is time to gather the top of the skirt.
Change the machine settings to:
Foot: Bernina #6 Embroidery foot with front hole for cord
Stitch: #2 zigzag
Stitch Width: 5.0
Stitch Length: 2

Thread white quilting thread through the middle hole of the foot and zig zag over the quilting thread close to the top edge of the fabric. Position the fabric (all three skirts) at the 1/4" mark on the sewing machine as you sew. Be sure the quilting thread is on the top of the fabric inside the zig zag stitches at all times. Cut the thread leaving an 8" tail at both ends. Sew the three sections separately for the skirt that has the sleeve openings (center back to right sleeve; right sleeve to left sleeve; left sleeve to center back). Do not stitch the sleeve openings. Replace foot #6 with Foot #1 and set the machine to normal stitch settings.

This is what it looks like up close. Be sure that the zig zag stitch does not catch the cord in the middle.

Sewing Instructions for Connecting Bodice to Skirts:
Take the skirt at the waist and divide it into fourths and mark with pins. (If sewing the skirt with the armholes, the armholes will be your markings so just mark center front with a pin.)

Mark center front of the Front Bodice with a pin.


Pin the Outside Bodice piece to the Outside Skirt piece, matching the pin markings. Do not pin bodice lining to skirt.

Start pulling on the long thread to gather the skirt. Keep pulling until you get to the center front pin. Then start pulling the long thread on the other side of the skirt, up to the center front pin.


When the gathers are tight enough, take the long thread cord and wrap a figure 8 around a pin to hold the gathers in place while you sew. NOTICE that the side back of the bodice is hanging off the skirt edge about 1/2" The bodice back seams will be sewn later.

Keep adjusting the gathers until they are evenly spaced and add lots of pins to hold them in place.


Instructions for the Skirt with the armholes: Pin the right side of the Front Bodice to the right side of the Skirt front. Gather the skirt to fit the bodice width. Do not pin or sew the underarm opening. Do not stitch the lining. Baste and then stitch. The gathers should be even and the previous stitching should not show on the right side.
Pin the right side of the Back Bodices to the right side of the Skirt backs. Gather the skirts to fit the bodices. Do not include the underarm opening. Do not stitch the lining. Baste and then stitch. The gathers should be even and the previous stitching should not show on the right side.
Stitch about 3/8" from the edge of the fabric, with the needle to the left of the zig zag stitch. Watch to make sure that the gathers stay evenly spaced as you sew over them.

The gathers should look smooth and evenly spaced from the right side of the dress. (Sorry that this picture is upside down.)

Press gathers in seam allowance area only to compress the bulk.

Before sewing Back Bodice center back seam, check to make sure the two back sides are the same length.

Pin the left center back to the lining center back. Pin the right center back to the lining center back. Fold up the lining fabric to match the waist seamline.


Trim the corner of the center back seam at the neckline to eliminate bulk.

Turn bodice center back seams right side out and press seam edge flat.


Fold the lining up and pin it to the seam line. Hand stitch using a blind stitch. You may need to trim the seam allowance of the skirts and also the lining. See instructor for a demonstration of the blind stitch or slipstitch. Also look at link below for slipstitch demonstration. https://www.youtube.com/watch?v=pxQqEf1Lcb4
Turn the dress right side out.
Sewing Instructions for Sleeves:

Stitch (baste) the edges of the armhole together close to the cut edge of the fabric.

Pin the Sleeves to the Bodice. Stitch using 1/4" - 3/8" seam allowance. The gathers should be even and the previous stitching should not show on the right side. Trim the seam allowance to 1/4". You may zig zag the raw edges or enclose raw edges with "Seams Great" binding.
Sewing Instructions for Finishing Dress:
Sew snaps on the center back Bodices. The snaps should be placed 1/8" from the neck edge and 1/8" from the center back seam. Another snap should be placed 1/8" from the Skirt seam and 1/8" from the center back seam. If another snap is needed (for the longer bodice), sew it between the two snaps already placed. The RIGHT BACK side must cross over the LEFT BACK side. You may want to sew buttons or ribbon roses over the snaps.
Add ribbon roses and other trim as desired.


Great Job!
***SEW***CREATE***LIVE***
***
*